Thursday, June 26, 2008

How to add Column/Row Validation Using Typed DataTable

In this post we will see how we can add the Validation Rule in Typed DataTable of a Typed DataSet (using Partial Class) and then how can we use this Validation on our Form in DataGridView or Details.

Level: Intermediate

Knowledge Required:
  • Typed DataSet
  • DataTable
  • Partial Class
  • DataGridView
  • ErrorProvider
Description:
This post is based on Beth Massi's Video Tutorial.

As we have used the DataGridView control for entering the data in a DataTable. If we have set one column of our DataTable AllowDBNull = False, then in DataGridView we encounter an exception when we try to enter a Null in this column. This exception can be handled in DataError event of DataGridView control. But the row will be removed from list anyway. So to make it more user friendly, we do the following things,

1) Set the AllowDBNull = True for the column
2) Add Validation Rule in the DataTable

Example:
I have created a Typed DataSet StudentDataSet in which I have added 1 Table
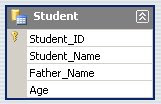

  • Student_ID (primary key, AllowDBNull=False, AutoIncreament=True)
  • Student_Name (AllowDBNull=True)
  • Father_Name (AllowDBNull=True)
  • Age (AllowDBNull=True)
All the columns (except the 1st one) are Allowed to have NULL values. Now we will add the Validation Business Rule in our DataTable by using Partial Class as,

Partial Class StudentDataSet
Partial Class StudentDataTable
Private Sub CheckStudentName(ByVal rowStudent As StudentDataSet.StudentRow)
If rowStudent.IsStudent_NameNull() OrElse rowStudent.Student_Name = "" Then
' set error
rowStudent.SetColumnError(Me.Student_NameColumn, "Student Name is Required")
Else
' ok clear the error
rowStudent.SetColumnError(Me.Student_NameColumn, "")
End If
End Sub

Private Sub CheckAge(ByVal rowStudent As StudentDataSet.StudentRow)
If rowStudent.IsAgeNull OrElse _
rowStudent.Age < 3 OrElse _
rowStudent.Age > 10 Then
rowStudent.SetColumnError(Me.AgeColumn, "Age must be between 3 to 10")
Else
rowStudent.SetColumnError(Me.AgeColumn, "")
End If
End Sub

Private Sub StudentDataTable_ColumnChanged(ByVal sender As Object, ByVal e As System.Data.DataColumnChangeEventArgs) Handles Me.ColumnChanged
If e.Column Is Me.Student_NameColumn Then
Call Me.CheckStudentName(CType(e.Row, StudentRow))
ElseIf e.Column Is Me.AgeColumn Then
Call Me.CheckAge(CType(e.Row, StudentRow))
End If
End Sub

Private Sub
StudentDataTable_TableNewRow(ByVal sender As Object, ByVal e As System.Data.DataTableNewRowEventArgs) Handles Me.TableNewRow
Call Me.CheckStudentName(CType(e.Row, StudentRow))
Call Me.CheckAge(CType(e.Row, StudentRow))
End Sub
End Class
End Class

First we have created 2 private methods

1) CheckStudentName() - validates the Student Name column
2) CheckAge() - validates the Age column

Then we have used 2 DataTable Events

1) ColumnChanged - in this event handler we check which column has been changed then we call the method according to that column
2) TableNewRow - in this event handler we execute both methods, since whole row is chagned

Here we have done with our Custom Validation. Now we just simply put the DataGridView control on Form, bind it with this DataTable and the rest of the things will be handled by DataGridView itself.

DataGridView:
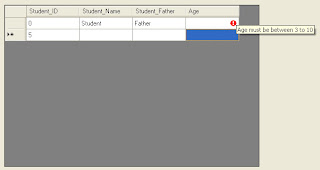
As you can see the DataGridView is Displaying a Red Icon in the Age column and it displays a ToolTip of Error that we have set in our Validation.

And finally when we are about to Save this Table, then we will first check the Error as,

If Me.StudentDataSet.Student.HasErrors() Then
MsgBox("Table contains Error, cannot save", MsgBoxStyle.Exclamation, "Save")
Else
MsgBox("Table does NOT contain any Error, can Save now", MsgBoxStyle.Information, "Save")
End If

Detail View:
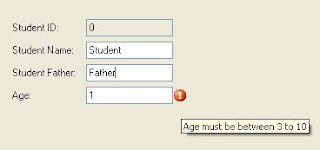

Now we can implement the same thing in our Detail View. As you can see the above Form I have put the TextBox Controls and have Bind them with the same Table. But to show the Error Icon we will use the ErrorProvider Component.

1) Add the ErrorProvider Component
2) Set its BindingSource to the StudentBindingSource

That is it, ErrorProvider will display the Error Icon with TextBox that violates the Business Rule. Note that StudentBindingSource is the same BindingSource which is Bound with the TextBox Controls.

Project Details:
Custom Validation on Typed DataTable

Project Download:
CustomValidation.zip

Tuesday, June 24, 2008

Try...Catch and Transaction in SQL Server 2005

Level: Intermediate

Knowledge Required:
  • T-SQL
  • SQL Server 2005
  • Stored Procedure

Description:
In Stored Procedure (having lots of INSERTs, UPDATESs and DELETEs) we use Transaction (Begin Tran, Commit Tran, RollBack Tran). We usually begin with Begin Tran and on some error we do RollBack Tran and if NO error occurred we Commit Tran.

A better way to do this task is to use the Try...Catch in SQL Server 2005. For example:
    Begin Try
BEGIN TRAN;

INSERT INTO ....

SELECT ...

INSERT INTO ...

DELETE ...

DELETE ...

INSERT ...

COMMIT TRAN;
End Try
Begin Catch
ROLLBACK TRAN;

DECLARE @ErrorMsg varchar(max);
DECLARE @ErrorSeverity int;
DECLARE @ErrorState int;

SET @ErrorMsg = ERROR_Message();
SET @ErrorSeverity = ERROR_SEVERITY();
SET @ErrorState = ERROR_STATE();

RAISERROR(@ErrorMsg, @ErrorSeverity, @ErrorState);
End Catch


As you can see,

1) We start the Transaction in Try...Catch block
2) Next we move forward and try to do insert, update and delete
3) If any error occurred during these statements the Exception will be caught in the Begin Catch...End Catch block
4) Then in this block we have first Rolled Back the Transaction
5) Then again throw the exception so the caller should know that some error was occurred during processing
6) And if NO exception occured then finally before the End Try we have Committed the Transaction

Monday, June 23, 2008

Paste Text in DataGridView Control (Bound with BindingSource)

DataGridView control does NOT have the built-in Paste functionality. Therefore we are going to create a Generic Function which will Paste Text in DataGridView control.

Level: Intermediate

Knowledge Required:
  • DataGridView
  • Clipboard
  • String
  • BindingSource
  • DataTable
Description:
In the my earlier post:

DataGridView Control FAQs and Quick Tips

I have discussed how to Copy Data from DataGridView control to Clipboard. Now we will see how can we Paste Data from Clipboard to DataGridView control. The following function is Generic for DataGridView control which is bound with some BindingSource. Optionally user can provide the DataTable (which is DataGridView source). This parameter is used in the function to check a Column whether it is Read-Only or NOT.

Features:
1) Paste Data at the End: Set the current position at the last row (which creates the new row) and execute the function, new rows will be added
2) Paste Data in the middle rows: Set the current position anywhere in middle (not at end) and execute the function, middle rows will be overwritten by new data
3) Paste Data in any column: Set the current position in any column and execute function, function will start pasting data from that particular column

Public Sub PasteInBoundDataGridView(ByVal dgvToUse As DataGridView, ByVal bsDataGridView As BindingSource, ByVal tblSource As DataTable)
Dim iCurrentRow As Integer = -1
Dim bFullRowSelected As Boolean = False

' if some row is selected
If dgvToUse.CurrentRow IsNot Nothing Then
' if it is NOT a new row
If Not dgvToUse.CurrentRow.IsNewRow Then
' get the index of that row
iCurrentRow = dgvToUse.CurrentRow.Index
End If

' if current row is selected
If dgvToUse.CurrentRow.Selected Then
' it means full row is selected
bFullRowSelected = True
End If
End If


' cancel the current edit
bsDataGridView.CancelEdit()

Dim sText As String
Dim sLines() As String
Dim iCurCol As Integer

' if full row is selected
If bFullRowSelected Then
' then set the initial column = 0
iCurCol = 0
Else ' else if full row is NOT selected
' set the initial column = current column
iCurCol = dgvToUse.CurrentCell.ColumnIndex
End If

' get the text from clipboard
sText = My.Computer.Clipboard.GetText()
' split the text into lines
sLines = sText.Split(New String() {vbCrLf}, StringSplitOptions.RemoveEmptyEntries)
' for each line in extracted lines
For Each sLine As String In sLines
Dim sColValues() As String
' split the line into columns
sColValues = sLine.Split(vbTab)

Dim c As Integer = iCurCol
Dim rowEdit As DataRowView

' if currently some middle rows are selected and also
' selected row is NOT the last row

If iCurrentRow >= 0 AndAlso iCurrentRow < dgvToUse.Rows.Count - 1 Then
' row is selected row
rowEdit = CType(dgvToUse.Rows(iCurrentRow).DataBoundItem, DataRowView)
' now move to next row
iCurrentRow += 1
Else ' else it means we are at end then
' we will add the row

rowEdit = bsDataGridView.AddNew
End If

' for each column in extracted columns
For Each sColValue As String In sColValues
' if this column is bound
If dgvToUse.Columns(c).DataPropertyName <> "" Then
' if some table is mentioned and also
' the column in which we are going to paste is NOT read-only

If tblSource Is Nothing OrElse _
Not tblSource.Columns(dgvToUse.Columns(c).DataPropertyName).ReadOnly Then
' if extracted value is empty string
If sColValue = "" Then
' then paste the DBNULL.value
rowEdit(dgvToUse.Columns(c).DataPropertyName) = DBNull.Value
Else ' else it means some value is mentioned
' then paste that value
rowEdit(dgvToUse.Columns(c).DataPropertyName) = sColValue
End If
End If
End If

' increase the column count
c += 1
' if reached at last column then stop setting values in columns
If c >= dgvToUse.Columns.Count Then Exit For
Next ' next column

' ok row edit is complete so end it

bsDataGridView.EndEdit()
Next 'next line
End Sub

Usage:
Private Sub Paste()
Try
If Not Me.DataGridView1.IsCurrentCellInEditMode Then
Call PasteInBoundDataGridView(Me.DataGridView1, Me.BindingSource1, Me.DataSet1.DataTable1)
End If
Catch
ex As Exception
MsgBox(ex.Message, MsgBoxStyle.Exclamation, "Paste")
End Try
End Sub


See Also:
DataGridView Control FAQs and Quick Tips

Saturday, June 21, 2008

Performing Aggregate Functions (MAX, MIN, SUM, COUNT) on DataTable

In this article we will discuss:
  • How to get Maximum (MAX) or Minimum (MIN) value from DataTable
  • How to SUM all the values of a column in DataTable
  • How to Count all the values of a column in DataTable
Level: Beginner

Knowledge Required:
DataTable

Description:
We have used DataTable Class of .net framework lots of time to load the data from Physical Database. DataTable NOT only stores the Data but can also perform other things like performing calculation on a column, e.g. getting Max./Min. item, counting, etc. So in this article we will discuss how can we perform this type of calculation on DataTable.

DataTable has a public method called Compute. We can use the aggregate functions in this method as,

Dim iMaxRow_ID As Integer
iMaxRow_ID = StudentTable.Compute("MAX(Row_ID)", "")


The above example will get the Maximum Row_ID (Row_ID is a column in StudentTable) from StudentTable.

Dim iTotalOrders As Integer
iTotalOrders = OrderTable.Compute("Count(Order_ID)", "Create_Date > #15-Jan-2008#")


Above example will count number of Orders that were created after 15-Jan-2008

For detailed information:

MSDN DataTable.Compute Method

Thursday, June 19, 2008

Get Unique Values from a Comma-Delimited String

Level: Intermediate

Knowledge Required:
  • Array
  • String

Description:
Here is a function that extracts out the unique values from comma delimited string.
Public Function GetUnique( _
ByVal sStringToUse As String, _
Optional ByVal sSeperator As String = ",", _
Optional ByVal LimitWords As Integer = 0 _
) As String
Dim sStrings() As String
Dim sToRet As String = ""

sStrings = sStringToUse.Split(sSeperator)

Dim i As Integer = 0
For Each s As String In sStrings ' for each item in array
Dim sTrimed As String = s.Trim()
' if limit is supplied and also limit is NOT over
If Not (LimitWords < 1 OrElse i < LimitWords) Then Exit For
' if this item is NOT added previously
If sToRet.IndexOf(sTrimed, StringComparison.CurrentCultureIgnoreCase) < 0 Then
i += 1
sToRet &= sTrimed & "," ' add it in list
End If
Next


If sToRet.Length > 0 Then ' if items found
' return them

Return sToRet.ToString().Substring(0, sToRet.Length - 1)
Else ' else (item NOT found)
Return "" ' return empty string
End If
End Function

Usage:
Dim a As String
a = "computer,hardware,computer,software,hardware,tools,downloads,software"
Debug.Print(GetUnique(a))

Output:
computer,downloads,hardware,software,tools

DataGridView control FAQs and Quick Tips

In this post we will discuss some FAQs regarding DataGridView control. I will be (inshaALLAH) updating this post, when I find new FAQ, if you have any question(s) you can contact me on my email address displayed on right side.

Level: Beginner

Introduction:

Q: What is DataGridView control?
Ans: DataGridView control is used to display the data from Data Source (e.g. DataTable) in a Tabular Form i.e. in Columns and Rows like Spreadsheet.

Q: How can I use DataGridView control?
Ans: DataGridView control can be used either by attaching it to some Data Source or without attaching it with any Data Source. You can simply drag and drop the control on form, add columns using Columns Properties or by using Smart Tags, run the program and start using the control just like you use the Excel.

Data Binding:

Q: How can I attach the DataGridView to some Data Source?
Ans: Attaching of DataGridView to some Data Source is called Data Binding. You can bind the DataGridView with DataTable directly or can use a BindingSource.

Q: How to Bind DataGridView to a DataTable Programmatically?
Ans: Use the following code

DataGridView1.DataSource = MyDataTable

Q: How to Bind DataGridView to a DataTable of a DataSet Programmatically?
Ans: Use the following code

DataGridView1.DataSource = MyDataSet
DataGridView1.DataMember = "MyTable"


Q: How to Bind DataGridView to a BindingSource Programmatically?
Ans: Use the following code

DataGridView1.DataSource = MyBindingSource

Q: When I Bind my DataGridView programmatically it automatically generates the Columns, how can I prevent it?
Ans: Set the AutoGenerateColumns Property = False before setting the DataSource

DataGridView1.AutoGenerateColumns = False
DataGridView1.DataSource = Me.BindingSource1


Q: I have added some columns in my DataGridView control and haven't bind it to anything, how can I add rows in it?
Ans: Use the following code

DataGridView1.Rows.Add(5) ' This will ad blank 5 Rows
OR
DataGridView1.Rows.Add("Item in 1st Column", "Item in 2nd Column")

Q: How to make DataGridView Read-only
Ans: Set the following properties,

AllowUserToAddRows = False
AllowUserToDeleteRows = False
ReadOnly = True


Selection:

Q: How can I select all the Columns and Rows (cells) of DataGridView control Programmatically?
Ans: Use the following code

DataGridView1.SelectAll()

Q: I want to change the selection style of DataGridView from single Cell to Full Row
Ans: Use the following code

DataGridView1.SelectionMode = DataGridViewSelectionMode.FullRowSelect

Q: How can I copy the Selected Cells onto Clipboard Programmatically?
Ans: Use the following code

My.Computer.Clipboard.SetDataObject(DataGridView1.GetClipboardContent())

Q: How can I Paste the data from Clipboard to DataGridView control?
Ans: See Paste Text in DataGridView Control (Bound with BindingSource)

Q: How can I prevent user to select multiple Cells/Rows? How can I restrict user to select only one cell/row at a time?
Ans: Set the property

DataGridView1.MultiSelect = False

Q: How can I get the current row of DataGridView which is selected?
Ans: Use DataGridView.CurrentRow property. This will be Nothing if no row exists in DataGridView.

Q: How can I get all currently Selected Rows of DataGridView control?
Ans: Use DataGridView.SelectedRows property.

Q: How can I get all currently selected cells of DataGridView control?
Ans: User DataGridView.SelectedCells property.

Q: How can I select DataGridView row programmatically?
Ans: Use the following code:

DataGridView1.Rows(0).Selected = True

Q: How can I change the current row of DataGridView control?
Q: DataGridView control's CurrentRow property is read-only, how can I change the Current Row?
Q: I want to change the focus (dotted border) to some other cell in DataGridView control, programmatically.

Ans: Use CurrentCell property,

DataGridView1.CurrentCell = DataGridView1.Rows(0).Cells(0)

Layout:

Q: I there any way to make all the columns fit in the DataGridView control?
Ans: 2 Ways

i) Set the DataGridView's AutoSizeColumnsMode = DataGridViewAutoSizeColumnsMode.Fill

OR

ii) Set at least one column's AutoSizeMode = DataGridViewAutoSizeColumnMode.Fill

Formatting:

Q: How can I change the Format of Numeric and Date Values in DataGridView?
Ans: Set the DefaultCellStyle.Format property

E.g.
Column1.DefaultCellStyle.Format = "dd-MMM-yyyy" ' display as 01-Jan-2008
Column2.DefaultCellStyle.Format = "N0" ' only numeric NO decimals


Definitions:

Q: What is Unbound Column in DataGridView control?
Ans: Unbound column is a column added in DataGridView control but NOT bound to any thing i.e. the Column's DataProperptyName Property has NOT been assigned any value.

Column1.DataPropertyName = ""

Q: What is Virtual Mode of DataGridView control?
Ans: When VirtualMode property of DataGridView Control is set to True, then the DataGridView Control is said to be in Virtual Mode. In this mode CellValueNeeded event triggers for Unbound Columns. In the event Handler of this event we provide some value (using e.Value) which then renders that value in cell.

Events:

Q: CellValueNeeded event is NOT being fired/triggered/executed!
Q: CellValueNeeded event is NOT working!

Ans: VirtualMode property of DataGridView control must be True, also CellValueNeeded is only triggered for Unbound Columns. See previous question.

Q: What event occurs when user Double clicks on a Cell in DataGridView control?
Ans: CellDoubleClick event

Q: What is the difference between CellContentClick and CellClick events in DataGridView control?
Ans:

CellContentClick is triggered for
*) DataGridViewLinkColumn
*) DataGridViewButtonColumn
*) DataGridViewCheckBoxColumn
when user click on link, button or checkbox in cell

CellClick event occurs when user clicks on Cell (NOT its contents i.e. link, button or checkbox)

Misc.:

Q: I have a Editable DataGridView control. I want to detect whether current row is the New Row (new row = last row in DataGridView which has a "*" sign in its row header)?
Ans: Use the IsNewRow property of DataGridViewRow

DataGridView1.Rows(0).IsNewRow

Q: When user presses TAB key in DataGridView Control, current cell changes to next cell, I want to suppress this behavior and want to change the Focus to next control, how can I do this?
Ans: Set the property of DataGridView

StandardTab = True

Q: How can I change the default Editing behavior of DataGridView Control?
Ans: Use the EditMode property, values can be:

EditOnEnter = Edit begins immediately when cell gets focus, no need to press F2 or any key
EditOnKeyStroke = Edit begins on Key stroke, NOT on F2
EditOnKeystrokeOrF2 = Edit begins on both F2 or Key stroke
EditOnF2 = Edit begins only on F2
EditProgrammatically = Edit programmatically i.e. you have to call BeginEdit() method

Q: I have bind my DataGridView to the DataTable, one column of this Table does NOT allow NULL, when user tries to enter a NULL value in this column through DataGridView control, an exception occurs but DataGridView automatically handles it and displays a big Dialog Box. How can I suppress it?
Ans: Use the DataError event of DataGridView control. In the handler of this event you can use e.Exception to see which exception is occurred, and can show your own Dialog Box.

Q: I started adding first row in DataGridView control, and then I pressed ESC (to cancel) an exception occurred which unfortunately cannot be handled, why?
Ans: This is a bug confirmed by Microsoft

See the following KB Article

FIX: Error message when you try to press ESC to cancel adding a new row to a DataGridView control in the .NET Framework 2.0: "An unhandled exception of type 'System.InvalidOperationException' occurred in System.Windows.Forms.dll"

How to check Column is Primary Key Column in DataTable

This article explains how to check a Column of DataTable whether it is a Primary Key column or NOT in a Un-Typed DataSet or Typed DataSet. Also we will discuss how to get the Primary Key columns of a DataTable.

Level: Beginner

Knowledge Required:
  • Typed DataSet / Un-Typed DataSet
  • DataTable
  • Primary Key
Description:
To check a column whether it is a Primary Key or NOT use the following function:

Private Function IsPrimaryKeyColumn(ByRef Table As DataTable, ByRef Column As DataColumn) As Boolean
Return Array.IndexOf(Table.PrimaryKey, Column) >= 0
End Function

DataTable exposes a property PrimaryKey() which is actually array of DataColumn, since a Primary Key can also be a composite key (key composed with more than one columns) that is why it is an Array. So we just search the given column in that array, if found then it means this column is a Primary Key.

Usage Typed DataSet:

Dim b As Boolean
b = IsPrimaryKeyColumn(OrderDataSet.Order, OrderDataSet.Order.Order_IDColumn)

Usage Un-Typed DataSet:

Dim b As Boolean
b = IsPrimaryKeyColumn(DS.Tables("Order"), DS.Tables("Order").Columns("Order_IDColumn"))

Wednesday, June 18, 2008

Working with Unicode

Level: Beginner

Knowledge Required:
  • String

Description:
Recently I have developed a Small Project Urdu Text Editor, in which I have used the Unicodes to display Urdu in Rich Text Box Control.

Thanks to Unicode, it has made our life so easy. In Urdu we have several forms of a single character unlike English in which we only have 1 form for each character. Normally there are 4 forms for each character in Urdu, e.g. Bay

1) Isolated Form of Bay

2) Initial Form of Bay

3) Middle Form of Bay

4) Final Form of Bay


If we do this manually then we have to do lots of coding, but as I have told that Unicode has made things much easier. Therefore we simply have to put the isolated form in the String and rest of the forms will be automatically handled by the Operating System.

Dim sBay As String
Dim sAlif As String
Dim sBaa As String
' get bay
sBay = System.Text.Encoding.Unicode.GetString(New Byte() {&H28, &H6})
' get alif
sAlif = System.Text.Encoding.Unicode.GetString(New Byte() {&H27, &H6})
' combining bay and alif => baa
sBaa = sBay & sAlif
Debug.Print(sBaa)


See above code in action:
Urdu Text Editor

Contact Me

If you need a help regarding Development in Windows Forms Application (.net Framework)

OR

If you want to give any comments/error reports/suggestions/etc. please contact me on,

Sunday, June 15, 2008

How to check a Bit whether it is 1 or 0 (zero) in an Integer (Bitwise Operations)

Level: Beginner

Knowledge Required:
  • Bitwise Operators
  • Enum

Description:
We usually get statuses from different resources, which contains one or more statuses together. So we require to check whether a particular Status is set or NOT.

Normally statuses are set using Enum

Example:

Public Enum EnumFontStyle
Regular = 0
Bold = 1
Italic = 2
Underline = 4
StrikeThrough = 8
End Enum

Public Sub Test()
Dim fs As EnumFontStyle
fs = EnumFontStyle.Bold OR EnumFontStyle.Italic
If fs And EnumFontStyle.Bold Then
MsgBox("Font is Bold")
Else
MsgBox("Font is NOT Bold")
End If
End Sub

To understand how it is working,

Suppose we have an integer = 3 => binary = 11, if we perform,

3 AND 2

This is in binary

11 AND 10

11
AND 10
----------
10 = 2
Hence bit number 2 is 1, because if we do,
4 AND 2 (binary = 100 AND 10)

100
AND 010
----------
000 = 0
This means bit number 2 = 0

See Also:
How to add/remove Attribute from File (Bitwise Operation)
How to Make a Bit Zero in an Integer (Bitwise Operation)

Creating Form on different Thread (UI Threading)

Level: Advanced

Knowledge Required:
Threading

Description:
Recently I was doing some research on Threading, I found that we can create Form in other Thread, but it requires to Execute Message Loop using Application.Run.

Example:
I have created 2 forms (Form1 and Form2) and put a Button on Form1 which creates the Form2 in different thread and shows it.
Form1 Code:
Public Class Form1
Private Sub Button1_Click(ByVal sender As System.Object, ByVal e As System.EventArgs) Handles Button1.Click
Debug.Print("Form1.Button1_Click: Current Thread=" & Threading.Thread.CurrentThread.ManagedThreadId)
Dim t As Threading.Thread
t = New Threading.Thread(AddressOf ShowForm2)
t.Start()
End Sub
Private Sub ShowForm2()
Debug.Print("Form1.ShowForm2: Current Thread=" & Threading.Thread.CurrentThread.ManagedThreadId)
Dim frmNew As Form2
frmNew = New Form2
'here frmNew.Show() will NOT work properly
'because we are in other thread then main thread

Application.Run(frmNew)
End Sub
End Class

And in Form2 I just put code in Load Event Handler to check the Current Thread in which Form2 is.
Form2 Code:
Public Class Form2
Private Sub Form2_Load(ByVal sender As System.Object, ByVal e As System.EventArgs) Handles MyBase.Load
Debug.Print("Form2_Load: Current Thread=" & Threading.Thread.CurrentThread.ManagedThreadId)
End Sub
End Class

I have put the Debug statements so that we can see which thread is performing that task, so the output of program,
Form1.Button1_Click: Current Thread=11
Form1.ShowForm2: Current Thread=12
Form2_Load: Current Thread=12

As you can see the output, when Button1 was clicked that was Thread=11 and when ShowForm2 method on Form1 was executed then it was Thread=12, therefore when Form2_Load() event fired it was also Thread=12.

So the new thread that was created will remain alive until the Form2 is NOT closed. I am NOT sure but I think this type of behaviour is called UI Threading.

Saturday, June 14, 2008

How to add/remove Attribute from File (Bitwise Operation)

This article explains how to add or remove Attributes (Read-only, Hidden, etc.) from a file using Bitwise Operators.

Level: Beginner

Knowledge Required:
Bitwise Operations

Description:
In my previous post:

How to Make a Bit Zero in an Integer (Bitwise Operation)

I explained a technique through which we can make a bit Zero in an Integer. In which we used the XOR bitwise operator. XOR actually reverts the bit i.e. if 0 then makes it 1 and if 1 then makes it 0. Therefore we can use XOR to make the bit 0 (Zero) if we are sure that bit is NOT already zero, otherwise we should use the technique described in this post.

For example, we are going to remove the Read-only Attribute from a file.

Remove Read-only Attribute from File:
Dim f As System.IO.FileInfo
f = New System.IO.FileInfo("C:\ABC.txt")
f.Attributes = f.Attributes And (Not IO.FileAttributes.ReadOnly)

Therefore to make the bit zero from an integer we use code

MainIntVar = MainIntVar AND (NOT IntBitToRemove)

Above code is useful to remove the Attribute (Read-only, Hidden, etc.) from a file. Similarly we can add attributes to file,

Add Read-only Attribute to File:
Dim f As System.IO.FileInfo
f = New System.IO.FileInfo("C:\ABC.txt")
f.Attributes = f.Attributes Or IO.FileAttributes.ReadOnly


See Also:
How to check a Bit whether it is 1 or 0 (zero) in an Integer (Bitwise Operations)
How to Make a Bit Zero in an Integer (Bitwise Operation)

Friday, June 13, 2008

How to add Serial Number Column in DataGridView

This article explains how to add a Serial Number (Row Index) Column in DataGridView control without adding this column in Physical Database or in DataSet's DataTable.


Level: Beginner

Knowledge Required:
  • DataGridView
  • Data Binding

Description:
We use DataGridView control alot of times in Data Manipulation application. Sometimes we require to have a Serial Number (S.No.) Column in DataGridView Control in such a way that no matter how Sorting/Filtering is done, Serial Number should remain constant i.e. in a Sequence.

One way to accomplish this is to create a Column in DataSet's DataTable in which we can store the Serial Numbers, but this will make our job too complex if sorting/filtering is also done. Because we have to re-check the Serial Number column again and again each time the Sorting/Filtering is performed.

So the better way is to use the DataGridView control's Virtual Mode. Here are the steps that we will do,

1) Bind the DataGridView control to some BindingSource and setup its Columns
2) Add another column (Unbound Column) and make it the first column
3) Set its name = ColumnSNo
4) Set its ReadOnly = True
4) Set the DataGridView control's VirtualMode property to True
5) In CellValueNeeded event use the following code:

Private Sub DataGridView1_CellValueNeeded(ByVal sender As Object, ByVal e As System.Windows.Forms.DataGridViewCellValueEventArgs) Handles DataGridView1.CellValueNeeded
If e.RowIndex >= 0 AndAlso e.ColumnIndex = Me.ColumnSNo.Index Then
e.Value = e.RowIndex + 1
End If
End Sub
Note that if we don't set the VirtualMode Property to True then CellValueNeeded event wouldn't fire


Summary:
To display the Serial Numbers we have added an unbound column and set the Virtual Mode Property of DataGridView control to True. Then in CellValueNeeded Event we just return the Row Index whose value is required

How to Make a Bit Zero in an Integer (Bitwise Operation)

Level: Intermediate

Knowledge Required:
Bitwise Operations

Description:
Sometimes it is required to make a certain bit Zero in an Integer value. For example,

Dim f As FontStyle
f = FontStyle.Bold Or FontStyle.Italic


So in the above Code we have put Bold and Italic both, now suppose we want to remove the Bold then we will use XOR Bitwise Operator as,

f = f XOR FontStyle.Bold

The Bold bit will be set to zero.

XOR:

0 XOR 0 = 0
0 XOR 1 = 1
1 XOR 0 = 1
1 XOR 1 = 0


Note that XOR is actually reverting the bit i.e. 0 (Zero) to 1 and 1 to 0 (Zero). Therefore use XOR if you are sure that the bit we are going to make 0 (zero) is currently 1, otherwise see the following article.

See Also:
How to check a Bit whether it is 1 or 0 (zero) in an Integer (Bitwise Operations)
How to add/remove Attribute from File (Bitwise Operation)

Thursday, June 12, 2008

Visual Basic Short Projects

I have created another blog in which I will (inshaALLAH) upload the Short Projects which may help the New Developers alot.

Visual Basic Short Projects

Wednesday, June 11, 2008

Dynamically Loading Data in TreeView Control

This article explains how to load data dynamically i.e. on runtime in TreeView Control. In this article we will discuss,
  • How to Store custom User Information with each Node of TreeView Control
  • Dynamically adding Nodes on Runtime

Level: Intermediate

Knowledge Required:
  • TreeView Control
  • Table
  • SQL Server Stored Procedure
  • ADO.net
  • DataTable
  • Inheritance

Description:
Sometimes we face a scenario in which we need to display the Data in TreeView control, in such a way that we do NOT load the whole Tree in one go, instead we load only root items first, and when user expands a node, then we load the child items of that particular node and add them underneath.

I am going to divide this solution in 4 phases
  1. Setup Database (an example)
  2. Setup Application to Database Connectivity
  3. Setup Custom TreeNode Class
  4. Putting it altogether
If you can understand the initial 2 phases then you can directly jump to phase 3.

Phase 1: Setup Database (an example)
We will create a table first, for example,

tbl_SearchEngineDirectory
  • Category_ID (primary key)
  • Category_Name
  • CategoryParent_ID (null able, foreign key, linked to Category_ID of this table)

So the above table is to store the Directory Structure of a Search Engine. For the Root entries we will store NULL in CategoryParent_ID column. Now we will create a stored procedure in Database which will return the Categories by supplying its Parent ID,

CREATE PROCEDURE GetCategory
@CategoryParent_ID int = NULL
AS
BEGIN
SET NOCOUNT ON
;

SELECT *
FROM tbl_SearchEngineDirectory
WHERE (CategoryParent_ID = @CategoryParent_ID) OR
(@CategoryParent_ID IS NULL AND CategoryParent_ID IS NULL);
END

Note that in above procedure if we pass NULL then it will return only the Root Categories.

Phase 2: Setup Application to Database Connectivity
Now we will implement this procedure in our Data Access Layer Class and for example have created a Function which will return the DataTable as,

Public Function GetCategory(ByVal CategoryParent_ID As Nullable(Of Integer)) As DataTable

(I am NOT discussing the internal code of above function as it is beyond the scope of this topic.)

Phase 3: Setup Custom TreeNode Class
This is one of the main steps since we will face an issue,

How are we going to Recognize which Node is expanded through which we can load the Children of that particular Node.

For this purpose we will create our own TreeNode class which is actually inherited from the same class but we will expand our properties with it as,

Public Class CategoryNode
Inherits TreeNode

Private _Category_ID As Integer
Private _Category_Name As String
Private _CategoryParent_ID As Nullable(Of Integer)

Public Property Category_ID() As Integer
Get
Return Me._Category_ID
End Get
Set
(ByVal value As Integer)
Me._Category_ID = value
End Set
End Property

Public Property Category_Name() As String
Get
Return Me
._Category_Name
End Get
Set
(ByVal value As String)
Me._Category_Name = value
End Set
End Property

Public Property CategoryParent_ID() As Nullable(Of Integer)
Get
Return Me._CategoryParent_ID
End Get
Set
(ByVal value As Nullable(Of Integer))
Me._CategoryParent_ID = value
End Set
End Property


Public Sub New(ByVal iCategory_ID As Integer, ByVal sCategory_Name As String)
Me._Category_ID = iCategory_ID
Me._Category_Name = sCategory_Name
Me._CategoryParent_ID = Nothing
End Sub

Public Sub New(ByVal iCategory_ID As Integer, ByVal sCategory_Name As String, ByVal iCategoryParent_ID As Integer)
Me.New(iCategory_ID, sCategory_Name)
Me._CategoryParent_ID = iCategoryParent_ID
End Sub

Public Overrides Function ToString() As String
Return Me._Category_Name
End Function
End Class

Phase 4: Putting it altogether
We will load each node in such a way that each Node will have a Temporary Child node for the first time. This is because we do NOT know whether any node has children OR not, and we want to display a Plus Sign with it. If we don’t do this then the node will never be able to expand since it has NO children. So whenever a node is expanded first we will remove the Temporary Node and then will add its Children, and if NO child exists in Database then we do nothing, and since the Temporary Node is already deleted therefore the Plus sign will also be removed.


We know that whenever a Node is expanded in the TreeView control 2 events are triggered,

1) BeforeExpand
2) AfterExpand

We can use both events, here I am going to use the 2nd event. In the handler of this event we will be getting the Node which is expanded. Here is the full code for Form1

Public Class Form1
Private Sub Form1_Load(ByVal sender As Object, ByVal e As System.EventArgs) Handles Me.Load
Call Me.FillParentCategories()
End Sub

Public Sub FillParentCategories()
Dim tblCat As DataTable
' Get Parent/Root Nodes only
tblCat = CateogryDataAccessClass.GetCategory(Nothing)
' now add them in TreeView
Me.AddCategories(Me.TreeView1.Nodes, tblCat)
' dispose the DataTable
tblCat.Dispose()
End Sub

' Method: AddCategories()
' Description: This method adds the Categories in the given NodeCollection
' Parameters:
' NodeCollection - Collection to be used to add Categories
' Categories - DataTable in which Categories are loaded

Private Sub AddCategories(ByRef NodeCollection As TreeNodeCollection, ByRef Categories As DataTable)
For Each r As DataRow In Categories.Rows
Dim nodCategory As CategoryNode
' if this is the Root element
If r.IsNull("CategoryParent_ID") Then
nodCategory = New CategoryNode(r("Category_ID"), r("Category_Name"))
Else
nodCategory = New CategoryNode(r("Category_ID"), r("Category_Name"), r("CategoryParent_ID"))
End If
' adding a Temporary Node
nodCategory.Nodes.Add("Loading...")
' Now add this node in the given collection
NodeCollection.Add(nodCategory)
Next
End Sub


Private Sub TreeView1_AfterExpand(ByVal sender As Object, ByVal e As System.Windows.Forms.TreeViewEventArgs) Handles TreeView1.AfterExpand
Dim nodFirst As TreeNode
nodFirst = e.Node.Nodes(0)
' if First Node is NOT the Category Node then
' it means we haven't filled this Node yet

If Not TypeOf nodFirst Is CategoryNode Then
' nodFirst is the temporary node we will remove it
nodFirst.Remove()
' now we are going to load the children
Dim nodCategory As CategoryNode
' first cast the expanded node into our Category node
' so we can check its ID
nodCategory = CType(e.Node, CategoryNode)
Dim tblCat As DataTable
' load its children
tblCat = CateogryDataAccessClass.GetCategory(nodCategory.Category_ID)
' now add them in TreeView
Me.AddCategories(e.Node.Nodes, tblCat)
' dispose the DataTable
tblCat.Dispose()
End If
End Sub
End Class

Summary:
  • On Load event we have loaded the Parent/Root Nodes and have added a Temporary Node with each node so the Plus Sign should be displayed.
  • Whenever a node is expanded:
    • First we check, have we loaded its children? (see code)
    • If NO then we load the children from database and add them in the same way i.e. also add a Temporary node with each node.

Tuesday, June 3, 2008

How to Convert String into Byte Array

Level: Beginner
Knowledge Required:
  • Text Encoding
  • String
  • Array
Description:
As I have discussed in my earlier post

How to Convert Byte Array into String

Now we will see how we can reverse this process i.e. Convert the String into Byte Array. We will use Text Encoding as,

byte array() = System.Text.Encoding.ASCII.GetBytes(string variable)

Usage:

Dim StringVariable As String = "ABC"
Dim ByteArray() As Byte
ByteArray = System.Text.Encoding.ASCII.GetBytes(StringVariable)
For Each b As Byte In ByteArray
Debug.WriteLine(b)
Next

Output will be:
65
66
67

See Also:

How to Convert Byte Array into String

Monday, June 2, 2008

How to add the Current Login Details while updating a Row (SQL Server 2005)

Introduction: This article explains how to add the Current Login Details (including, Login ID, Date Time and IP Address) while updating a Row in SQL Server 2005.
Level: Intermediate
Knowledge Required:
  • T-SQL
  • SQL Server 2005
  • Table
  • Default Column Value
  • User Defined Function
Description:
While saving the data in a Table, we can also save the Login Details like Login ID, Date Time and IP Address with each row. This way we can audit the table. To accomplish this we can also handle it in our insert stored procedure but it is better to use the Default Column Values here, since it is much easier and one time job. However we need to do coding in our Update Stored Procedure.

Default Column Value: While inserting the new Row, if we ignore a column and do NOT include in the Column list then SQL Server puts the Default Value (which we have given) to this column also the Column should be Allow Nulls = False, otherwise SQL Server will put NULL into this column.

For example: we have a Table Student as,
  • Student_ID
  • Student_Name
  • Student_FatherName
If we have created a Front-End application and several users are Inserting/Updating the Students. So we cannot track which user inserted that student and which user updated that student. For this purpose we can add 4 columns in our table as,
  • Update_User
  • Update_DateTime
  • Update_IPAddress
  • Update_Count
All fields are Allow Nulls = False

1) To Get the Current Login: SUSER_NAME() Function
2) To Get the Current DateTime: GetDate() Function
3) To Get the IP Address: We will create our own Function

So for the above 2 tasks we have built-in functions, but for the 3rd one we need to create our own function. Fortunately we have discussed this issue in my previous post:

How to get Client IP Address in SQL Server 2005

In the same post we have created a User Defined Function, so we are going to use the same function here.

Thats it, now we only need to put the Default Values for our Columns,

Update_User:
Default Value or Binding: Getdate()

Update_DateTime:
Default Value or Binding: SUSER_NAME()

Update_IPAddress:
Default Value or Binding: dbo.GetCurrentIP()

Update_Count:
Default Value or Binding: 0

Note: To set the Default Value for a column (open table in Design mode)
1) Select the Column (of which you want to set Default Value)
2) Locate the "Default Value or Binding" in the Column Properties (5th property)
3) Type the Value which you want to set as Default

Now open the Table and only type ID, Name and Father Name and refresh the Table you will notice that SQL Server has automatically set the Values for other columns.

Next we will update our Update Stored Procedure as,

CREATE PROCEDURE [dbo].[UpdateStudent] 
@Student_ID int,
@Student_Name varchar(255),
@Student_FatherName varchar(255)
AS
BEGIN
SET NOCOUNT ON
;

UPDATE tbl_Student
SET Student_Name = @Student_Name,
Student_FatherName = @Student_FatherName,
Update_User = SUSER_NAME(),
Update_DateTime = GetDate(),
Update_IPAddress = dbo.GetCurrentIP(),
Update_Count = Update_Count + 1
WHERE
Student_ID = @Student_ID;
End

How to get Client IP Address in SQL Server 2005

Level: Intermediate
Knowledge Required:
  • T-SQL
  • SQL Server 2005
Description:
While executing some query, sometimes it is required to have the Client's IP Address who is executing this Query.
SELECT client_net_address
FROM sys.dm_exec_connections
WHERE session_id = @@SPID;

We can also put this Query into some function which can be used further.

CREATE FUNCTION [dbo].[GetCurrentIP] ()
RETURNS varchar(255)
AS
BEGIN
DECLARE
@IP_Address varchar(255);

SELECT @IP_Address = client_net_address
FROM sys.dm_exec_connections
WHERE Session_id = @@SPID;

Return @IP_Address;
END

How to Convert Byte Array into String

Level: Beginner

Knowlege Required:
  • Text Encoding
  • String
  • Array
Description:
Sometimes it is required to convert the byte Array into String. For example if we have read the bytes from some Stream (like reading a file or getting data from port) then we may need to convert that Byte Array into String so we can display it somewhere.

For this purpose we use Text Encoding:

StringVariable = System.Text.Encoding.ASCII.GetString(byte array)

Usage:
Dim b(5) As Byte

b(0) = 65
b(1) = 66
b(2) = 67
b(3) = 68
b(4) = 69

Debug.Print(System.Text.Encoding.ASCII.GetString(b))

Output will be:
ABCDE


See Also:

How to Convert String into Byte Array