Showing posts with label Intermediate Topics. Show all posts

Thursday, September 11, 2008

How to handle Overlapping of Large Text Fields in Crystal Reports

Level: Intermediate

Knowledge Required:
Crystal Reports

Description:
While working in Crystal Reports, we sometimes face a scenario when we need to put a Large Text Field (which can grow upto multiple lines). The issue comes if we try to put another Field after this Text Field. Example:


As you can see in above I have put to Formula Fields, both will contain Large Text which may expand. So here is the preview,


Therefore to solve this issue we can create multiple sub-sections in the same section. This can be achieved by Section Expert.


Now we will put the Fields in different sub-sections as,


And here is the preview again,


Note that in Crystal Reports Sections automatically expand, that is why when the first Text Field expands, the section also expands itself, therefore ultimately the next field renders properly.

Thursday, September 4, 2008

Using DataGridView CheckBox Column as RadioButton (OptionButton)

Level: Beginner Knowledge Required:
  • DataGridView Control
  • Data Binding
Description: In this post we shall see that how we can transform DataGridView control’s CheckBox column into Radio Button (option button). I have done 2 main things,
  1. Created a back-end logic when user clicks on CheckBox Column so only one CheckBox should be checked at a time
  2. Change the look of CheckBox column so it looks a Radio Button Column
So to understand the first one, consider a DataGridView control as shown in the above figure. This DataGridView control is actually bind with a DataSet for example, As you can see there are 2 columns. The IsSelected column is actually a Boolean column which is normally rendered as CheckBox in DataGridView control. What we will be doing is that we first set our DataGridView to Read Only i.e., AllowUserToAddRows = False AllowUserToDeleteRows = False ReadOnly = True We are making our DataGridView control Read Only because it is easier to set the CheckBox checked or unchecked programmatically otherwise DataGridView control itself will be interfering and will create problems and complexities for us. OK now whenever user clicks on CheckBox we will be performing our custom operation. To do this we will use the DataGridView’s CellContentClick event. Here is the code,
Private Sub ShutDownOptionsDataGridView_CellContentClick(ByVal sender As System.Object, ByVal e As System.Windows.Forms.DataGridViewCellEventArgs) Handles ShutDownOptionsDataGridView.CellContentClick
    If e.ColumnIndex = Me.columnIsSelected.Index Then
        Dim drv As DataRowView
        Dim rowShutDownOption As ShutdownOptionDataSet.ShutDownOptionsRow
        ' in this event handler we know that which DataGridView's row is clicked
        ' so we are going to extract out the actual DataTable's row which is
        ' bind with this DataGridView's Row
        drv = CType(Me.ShutDownOptionsDataGridView.Rows(e.RowIndex).DataBoundItem, DataRowView)
        ' get the DataTable's row
        rowShutDownOption = CType(drv.Row, ShutdownOptionDataSet.ShutDownOptionsRow)

        ' get the row which is currently selected
        Dim rowCurrentlySelected() As ShutdownOptionDataSet.ShutDownOptionsRow
        rowCurrentlySelected = Me.ShutdownOptionDataSet.ShutDownOptions.Select("IsSelected=True")
        ' if some row found then make it de-selected
        If rowCurrentlySelected.Length > 0 Then
            rowCurrentlySelected(0).IsSelected = False
        End If
            ' ok now select the row which is clicked
        rowShutDownOption.IsSelected = True
    End If
End Sub
What we do is first get the row in which IsSelected=True and we make that row IsSelected=False. Then we set the row which is clicked as IsSelected=True. Next thing is to change the look of CheckBox to OptionButton / RadioButton. For this purpose we will be using DataGridView’s CellPainting event. Here is the code,
Private Sub ShutDownOptionsDataGridView_CellPainting(ByVal sender As Object, ByVal e As System.Windows.Forms.DataGridViewCellPaintingEventArgs) Handles ShutDownOptionsDataGridView.CellPainting
    If e.ColumnIndex = Me.columnIsSelected.Index AndAlso _
        e.RowIndex >= 0 Then
        e.PaintBackground(e.ClipBounds, True)

        Dim rectRadioButton As Rectangle

        rectRadioButton.Width = 14
        rectRadioButton.Height = 14
        rectRadioButton.X = e.CellBounds.X + (e.CellBounds.Width - rectRadioButton.Width) / 2
        rectRadioButton.Y = e.CellBounds.Y + (e.CellBounds.Height - rectRadioButton.Height) / 2

        If IsDBNull(e.Value) OrElse e.Value = False Then
            ControlPaint.DrawRadioButton(e.Graphics, rectRadioButton, ButtonState.Normal)
        Else
            ControlPaint.DrawRadioButton(e.Graphics, rectRadioButton, ButtonState.Checked)
        End If

        e.Paint(e.ClipBounds, DataGridViewPaintParts.Focus)

        e.Handled = True
    End If
End Sub
As you can see we have used the ControlPaint class to draw the RadioButton / OptionButton. Download: DGVCheckBoxAsRadioButton.zip

Wednesday, September 3, 2008

Asynchronous Data Loading using TableAdapter with Cancel Feature

Level: Intermediate Knowledge Required:
  • BackgroundWorker Control
  • DataGridView Control
  • Data Binding
  • TableAdapter
Description: In my previous post Implement SQLCommand Cancel with Threading I have discussed how to implement the SQLCommand Cancel using Threading. In this post we shall see, how we can implement the same feature in a TableAdapter. As we know that TableAdapter is used as a middle level man standing between Physical Database and Typed DataSet. Which gets the data from Physical Database and loads into Typed DataSet. Sometimes this loading of data takes time (for example due to complex query). Therefore we can provide the user an ability to cancel the on going command by clicking on Cancel Button. I have created a Test Database (TestDB) and have added a table (tbl_Student). Also I have added a Stored Procedure (GetStudent). Take a look at this Stored Procedure:
CREATE PROCEDURE [dbo].[GetStudent] 
AS
BEGIN
    SET NOCOUNT ON;

    -- here we are simulating a very long query
    -- which takes 3 seconds to complete
    WAITFOR DELAY '00:00:03';

    SELECT *
    FROM tbl_Student;
END
In this procedure I have added a WAITFOR DELAY SQL Statement. Which simulates a long query that takes time 3 seconds. We will call this procedure from our TableAdapter to fill the DataTable. Now we will add the SQLCommand Cancel stuff in our TableAdapter. This can be achieved by creating a Partial Class of TableAdapter,
Namespace TestDataSetTableAdapters
    Partial Class StudentTableAdapter
        Public Sub CancelSelect()
            Me.Adapter.SelectCommand.Cancel()
        End Sub
    End Class
End Namespace
As you see I have given the name of method CancelSelect which actually cancels the SelectCommand of Adapter. Note that I haven’t implemented any checking here (for example is command executing or NOT). This is upto the user of TableAdapter class. He/She will be responsible to check before executing this method. Here we have done with our TableAdapter. Now next thing is to implement the loading in the different Thread. For this purpose I have used the BackgroundWorker control which is quite simple. The overall idea is,
  • Create 2 buttons
    • LoadButton
    • CancelButton
  • When LoadButton is clicked
    • Execute the BackgroundWorker
  • In BackgroundWorker DoWork Event Handler
    • Note somewhere that Execution is started
    • Execute the Fill() Method of TableAdapter
  • When CancelButton is clicked
    • Check if execution is started then
      • Execute the CancelSelect() method of TableAdapter
Update Sep-4-2008: Here is the code of Form1
Public Class Form1

    ' ErrorText will contain the error information if occurred
    ' while loading data in different thread
    Private _ErrorText As String
    ' this boolean variable will be true when command is executed
    Private _CommandExecuted As Boolean

    Private Sub btnLoad_Click(ByVal sender As System.Object, ByVal e As System.EventArgs) Handles btnLoad.Click
        ' first we will disable the Load button so it should NOT be clicked again
        Me.btnLoad.Enabled = False
        ' then we will enable the Cancel button so the command can be canceled
        Me.btnCancel.Enabled = True
        ' set the status text
        Call Me.SetStatusText("Loading...")

        ' clear the Error Text
        Me._ErrorText = ""

        ' here we have first clear the currently loaded data
        ' from DataSet, because the Adapter will fill the DataSet
        ' in different thread, therefore it will create problems
        ' while displaying the same data (which is being modified
        ' in different thread) in DataGridView
        Me.TestDataSet.Clear()

        ' start the asynchronous task
        Me.BackgroundWorker1.RunWorkerAsync()
    End Sub

    Private Sub BackgroundWorker1_DoWork(ByVal sender As Object, ByVal e As System.ComponentModel.DoWorkEventArgs) Handles BackgroundWorker1.DoWork
        Try
            ' first set the executed flag
            Me._CommandExecuted = True
            ' execute the command
            Me.StudentTableAdapter.Fill(Me.TestDataSet.Student)
        Catch ex As Exception
            _ErrorText = ex.Message
        End Try
    End Sub

    Private Sub BackgroundWorker1_RunWorkerCompleted(ByVal sender As Object, ByVal e As System.ComponentModel.RunWorkerCompletedEventArgs) Handles BackgroundWorker1.RunWorkerCompleted
        ' ok our data is loaded now
        ' so enable the Load button
        Me.btnLoad.Enabled = True
        ' disable the Cancel button
        Me.btnCancel.Enabled = False
        ' if NO error was occurred in thread
        If Me._ErrorText = "" Then
            Me.SetStatusText(Me.TestDataSet.Student.Count & " Records loaded")
        Else ' else (some error was occurred)
            Me.SetStatusText(Me._ErrorText)
        End If
        ' since data is changed in different thread
        ' therefore by reseting the Bindings the DataGridView
        ' will refresh itself and will display all the data
        Me.StudentBindingSource.ResetBindings(False)
    End Sub

    Private Sub btnCancel_Click(ByVal sender As System.Object, ByVal e As System.EventArgs) Handles btnCancel.Click
        ' if command is executed then
        If Me._CommandExecuted Then
            ' cancel it
            Me.StudentTableAdapter.CancelSelect()
        End If
    End Sub


    Private Sub SetStatusText(ByVal sText As String)
        Me.lblStatus.Text = sText
    End Sub
End Class
Download: TableAdapterWithCancel.zip Note: The zip file contains TestDBScript.sql T-SQL Script which will, 1) Create a database "TestDB" 2) Create a table "tbl_Student" in that database 3) Create a Stored Procedure "GetStudent" 4) Put some data in tbl_Student Please execute this script before running the project.

Saturday, July 19, 2008

Function to Trim any Character/String from Left of varchar in SQL Server

An Extended Left Trim (LTRIM) Function for SQL Server which removes given string/character from Left of another varchar (String)

Level: Intermediate

Knowledge Required:
  • T-SQL
  • SQL Server 2005
  • SQL Server User Define Functions
Description:
The SQL Server's built-in LTrim() function removes only the blanks (spaces) from Left of a varchar (string). Here is a User Defined function which can remove any character.

CREATE FUNCTION [dbo].[LTrimString]
(
-- Add the parameters for the function here
@StringToTrim varchar(max),
@CharToTrim varchar(10)
)
RETURNS varchar(max)
AS
BEGIN

-- Declare the return variable here
DECLARE @Result varchar(max);
DECLARE @i int;
DECLARE @l int;
DECLARE @sl int;

SET @i = 1;
SET @l = Len(@StringToTrim);
SET @sl = Len(@CharToTrim);
While @i < @l
Begin
If
SubString(@StringToTrim, @i, @sl) <> @CharToTrim
Begin
SET @Result = SubString(@StringToTrim, @i, @l - @i + 1);
Break;
End
SET
@i = @i + @sl;
End

SET
@Result = IsNull(@Result, @StringToTrim);

-- Return the result of the function
RETURN @Result;
END

Usage:
Print dbo.LTrimString('00000005221', '0')

Output:
5221

Thursday, July 17, 2008

Replace with Regular Expression

This article explains some outstanding usage of Regular Expression's Replace Method

Level: Intermediate

Knowledge Required:
Regular Expressions

Description:
Currently I am working on a Tool (Short Project) to convert the code into HTML. This is my requirement, since it takes time to convert the code into HTML format, before I can paste into Blogger.

So I will be heavily using Regular Expression (RegEx Class) in this project. Meanwhile I am sharing the core technique here.

In code we use Keywords, words that highlight with different color. For example "Dim", "Me", "As", "For", etc. I use "span" or "font" tag to change the text color. E.g.

<span style="color:blue;">Dim</span>

Usually keywords found to be separated with white-spaces,

Dim myVar As String

3 Keywords: Dim, As, String

All of them are separated with Space. But some keywords are used as Instances,

Me.TextBox1.Text = "ABC"

Here "Me" has "." (full stop)

As per above findings, I decided,

To Convert the Code into HTML replace the Keywords with the Tags

Me.TextBox1.Text = "ABC"

we can replace the above line as,

<span style="color:blue;">Me</span>.TextBox1.Text = "ABC"

So here we are using the Replace. Which gave me the idea to use the Regular Expression, because its Replace method is very flexible. First we need to decide the Pattern. For the above case the pattern will be,

(\W|^)(Me)(\W|$)

In above statement () brackets are indicating Groups. Therefore in above pattern I have used 3 groups. Which we will be using in Replace String.

Next we need to decide what should be the Replace String.

$1<font color=blue>$2</font>$3

The above string means that while replacing,

1) Put Group #1
2) Put Font Tag
3) Put Group #2
4) Close the Font Tag
5) Put the Group #3

That's it, here is the complete code,

Dim sCode As String
Dim sHTML As String

sCode = "Me.TextBox1.Text=""Abc"""
sHTML = System. _
Text. _
RegularExpressions. _
Regex.Replace( _
sCode, _
"(\W|^)(Me)(\W|$)", _
"$1<font color=blue>$2</font>$3", _
System.Text.RegularExpressions.RegexOptions.IgnoreCase _
)
Debug.Print(sHTML)

Monday, July 14, 2008

Custom Tab Control Layout

Level: Intermediate Knowledge Required:
  • Tab Control
  • GDI+
Description: In previous post, Custom Tab Control We have discussed how to change the Tab Control layout so that we can make it more attractive by changing the background color and tab buttons' color. As I have mentioned in that post that there are some other techniques too, so in this post we shall see a simple way. By default Tab Control's Tab Buttons are Aligned Top, So first we are going to change its alignment to Left, by setting the property: Alignment = Left If you have XP themes turned on then you may notice the weird layout of Tab Control. Don't worry we will make it fine. As you may have noticed that Tabs are vertical, and our requirement is horizontal. So we can change the size of Tabs. But before we can do this we have to set the SizeMode property as, SizeMode = Fixed Now we can change the size by using the ItemSize property, ItemSize = 30, 120 Width = 30 and Height = 120 After setting the Alignment = Left, Tab control rotates the Tabs which causes the Width and Height seem to be reversed. That is why when we increase Height, we see that width is increasing and when we increase width the height is effected. Now Text will also be displaying, but vertically. Unfortunately there is no simple way to resolve this issue. For this purpose we have to write the Text by ourselves. To do this we will first set the DrawMode DrawMode = OwnerDrawFixed Now its our job to display the Text on Tabs. Since we have set the DrawMode property = OwnerDrawFixed, therefore we can use the DrawItem event as,
Private Sub TabControl1_DrawItem(ByVal sender As Object, ByVal e As System.Windows.Forms.DrawItemEventArgs) Handles TabControl1.DrawItem
    Dim g As Graphics
    Dim sText As String
    Dim iX As Integer
    Dim iY As Integer
    Dim sizeText As SizeF
    Dim ctlTab As TabControl

    ctlTab = CType(sender, TabControl)

    g = e.Graphics

    sText = ctlTab.TabPages(e.Index).Text
    sizeText = g.MeasureString(sText, ctlTab.Font)
    iX = e.Bounds.Left + 6
    iY = e.Bounds.Top + (e.Bounds.Height - sizeText.Height) / 2
    g.DrawString(sText, ctlTab.Font, Brushes.Black, iX, iY)
End Sub
Download Source: CustomTabControlLayout.zip

Customized Tab Control

Level: Intermediate Knowledge Required:
  • Custom Controls
  • Tab Control
  • Inheritance
  • GDI+
Description: In this post we will discuss how can we customize a Tab Control, as shown in above figure. There are different ways to customize a Tab Control. One way is to use Custom Painting by overriding the OnPaint method of Tab Control. We will use the same way here. We will create a control, inherited from Tab Control. Then in the New() method (constructor), we will set style as,
Me.SetStyle(ControlStyles.AllPaintingInWmPaint, True)
Me.SetStyle(ControlStyles.UserPaint, True)
The 2nd line tells the Tab Control NOT to use its own Control Drawing, instead use the OnPaint method to draw the contents of control. Note that the Tab Pages will be rendered by themselves, we don't need to handle them. In the OnPaint Method we will perform as, 1) Create the Background of Tab Control 2) Draw the Tab Buttons For drawing the Tab Buttons we will use the GetTabRect() method, which returns the bounds of Tab Button to be displayed. That is the core customization. Additionally I have added other properties,
PropertiesDescription
BackColorControl's background color
HeaderWidthWidth of Tab Buttons
HeaderHeightHeight of Tab Buttons
HeaderAlignmentText Alignment in the Tab Button
HeaderPaddingPadding of Text in the Tab Button
HeaderBorderColorTab Button Border Color
HeaderFontFont of Tab Button
HeaderBackColorBackground Color of Tab Button
HeaderForeColorText Color of Tab Button
HeaderSelectedBackColorBackground color of Selected Tab Button
HeaderSelectedForeColorText Color of Selected Tab Button
Download the Source: CustomTabControl.zip

Thursday, July 3, 2008

Making Enter Key, Move to Next Cell/Column in DataGridView After Cell Edit

This article explains how we can customize the DataGridView control so that when Enter Key is pressed then cursor (current selection) move to next cell / column after Cell Edit. Level: Intermediate Knowledge Required: DataGridView Description: By default in DataGridView control, when we press Enter Key to stop the editing in Current Cell, cursor moves to next Row and the current row is saved. This style is adopted from Excel, users working on Excel feel no problem with this. But users who worked in older applications do NOT like this type of editing. What they want is when Enter Key is pressed then Cursor should move to next cell / column. In DataGridView control we need to press TAB key to achieve this. Now we are going to customize the DataGridView control, so that when User Stop the Editing in Current Cell by pressing Enter Key then cursor should move in next cell / column. To understand the solution first note the followings, 1) When user presses enter key to stop the Editing, DataGridView CellEndEdit event occurs 2) Then cursor (current selection) moves to next row, on this point SelectionChanged event occurs To achieve this I have used a logic, 1) When CellEndEdit event occurs, I note the Cell which was Edited 2) Then in SelectionChanged event, I first check if this event is occured after the Editing, then I set the cursor (current selection) in the same row but next column of last edited cell Here I have created a customized control which is actually inherited from DataGridView control, and have added this functionality.
Public Class DataGridViewEnterMoveNext
    Inherits DataGridView

    Dim celWasEndEdit As DataGridViewCell
    Private _EnterMoveNext As Boolean = True

    <System.ComponentModel.DefaultValue(True)> _
    Public Property OnEnterKeyMoveNext() As Boolean
        Get
            Return Me._EnterMoveNext
        End Get
        Set(ByVal value As Boolean)
            Me._EnterMoveNext = value
        End Set
    End Property

    Private Sub DataGridView_CellEndEdit(ByVal sender As Object, ByVal e As System.Windows.Forms.DataGridViewCellEventArgs) Handles Me.CellEndEdit
        Me.celWasEndEdit = Me(e.ColumnIndex, e.RowIndex)
    End Sub

    Private Sub DataGridView_SelectionChanged(ByVal sender As Object, ByVal e As System.EventArgs) Handles Me.SelectionChanged
        ' if Enter Move Next should work andalso
        '    mouse button was NOT down
        ' we are checking mouse buttons because if select was changed
        ' by Mouse then we will NOT do our Enter Move Next
        If Me._EnterMoveNext AndAlso MouseButtons = 0 Then
            ' if selection is changed after Cell Editing
            If Me.celWasEndEdit IsNot Nothing AndAlso _
               Me.CurrentCell IsNot Nothing Then
                ' if we are currently in the next line of last edit cell
                If Me.CurrentCell.RowIndex = Me.celWasEndEdit.RowIndex + 1 AndAlso _
                   Me.CurrentCell.ColumnIndex = Me.celWasEndEdit.ColumnIndex Then
                    Dim iColNew As Integer
                    Dim iRowNew As Integer
                    ' if we at the last column
                    If Me.celWasEndEdit.ColumnIndex >= Me.ColumnCount - 1 Then
                        iColNew = 0                         ' move to first column
                        iRowNew = Me.CurrentCell.RowIndex   ' and move to next row
                    Else ' else it means we are NOT at the last column
                        ' move to next column
                        iColNew = Me.celWasEndEdit.ColumnIndex + 1
                        ' but row should remain same
                        iRowNew = Me.celWasEndEdit.RowIndex
                    End If
                    Me.CurrentCell = Me(iColNew, iRowNew)   ' ok set the current column
                End If
            End If
            Me.celWasEndEdit = Nothing                      ' reset the cell end edit
        End If
    End Sub
End Class
Note that I have added a property OnEnterKeyMoveNext if this property is True then our customization will work otherwise NOT. Limitations: As you can see when user presses enter key, the row will be first saved in DataGridView control (ultimately the Source of DataGridView is updated), at this point if one or more columns are NOT allowed to have NULL values then our customization will NOT work properly. Since exception will be thrown and the row will be deleted. To overcome this issue we can set the AllowDBNull = False in our DataTable (which is bind with DataGridView) and use the custom validation as discussed in my previous post. How to add Column/Row Validation Using Typed DataTable Download Source Code: DataGridViewEnterAsTab.Zip See Also: DataGridView control FAQs and Quick Tips Paste Text in DataGridView Control (Bound with BindingSource)

Wednesday, July 2, 2008

Changing Connection String in TableAdapter

This article describes a way to change a Connection String in TableAdapter

Level: Intermediate

Knowledge Required:
  • Typed DataSet
  • TableAdapter
  • Partial Class
  • Project Settings
Description:
As we have used the DataSet Designer from Visual Studio, to create a Typed DataSet. Usually our Typed DataSet contains TableAdapter which interacts with Physical Database. When we first time add Typed DataSet using DataSet Designer, it adds a Connection String in the Project Setting. This connection string is by default accessed by the TableAdapter. Note that the connection string in Project Setting is defined with Scope = Application, which makes it a read-only property, therefore cannot be changed from code.

But sometimes it is required to change the Connection String, for example if different users log in the software then connection string will be different for each user with respect to their Login IDs and Passwords.

So to resolve this issue we can directly access the Connection property of TableAdapter to set the ConnectionString.

MyTableAdapter.Connection.ConnectionString = "...."

But another approach is to modify the TableAdapter using Partial Class and add methods that shall allow us change the Connection String, example,

Namespace CityDataSetTableAdapters
Partial Class CityTableAdapter
Public Sub New(ByVal sConStr As String)
Me.New()
Me.Connection.ConnectionString = sConStr
End Sub

Public Sub SetNewConnectionString(ByVal sConStr As String)
Me.Connection.ConnectionString = sConStr
End Sub
End Class
End Namespace

Now we can create another Setting in our Project with Scope = User and then we will change this setting according to current login in our code.


Usage:
Dim adpCity As CityDataSetTableAdapters.CityTableAdapter
Dim tblCity As CityDataSet.CityDataTable

My.Settings.MyConnectionString = "Data Source=.;Initial Catalog=MyDatabase;Persist Security Info=True;User ID=user;Password=password"
adpCity = New CityDataSetTableAdapters.CityTableAdapter(My.Settings.MyConnectionString)
tblCity = adpCity.GetData()
Debug.Print(tblCity.Count)

Thursday, June 26, 2008

How to add Column/Row Validation Using Typed DataTable

In this post we will see how we can add the Validation Rule in Typed DataTable of a Typed DataSet (using Partial Class) and then how can we use this Validation on our Form in DataGridView or Details.

Level: Intermediate

Knowledge Required:
  • Typed DataSet
  • DataTable
  • Partial Class
  • DataGridView
  • ErrorProvider
Description:
This post is based on Beth Massi's Video Tutorial.

As we have used the DataGridView control for entering the data in a DataTable. If we have set one column of our DataTable AllowDBNull = False, then in DataGridView we encounter an exception when we try to enter a Null in this column. This exception can be handled in DataError event of DataGridView control. But the row will be removed from list anyway. So to make it more user friendly, we do the following things,

1) Set the AllowDBNull = True for the column
2) Add Validation Rule in the DataTable

Example:
I have created a Typed DataSet StudentDataSet in which I have added 1 Table
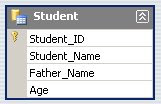

  • Student_ID (primary key, AllowDBNull=False, AutoIncreament=True)
  • Student_Name (AllowDBNull=True)
  • Father_Name (AllowDBNull=True)
  • Age (AllowDBNull=True)
All the columns (except the 1st one) are Allowed to have NULL values. Now we will add the Validation Business Rule in our DataTable by using Partial Class as,

Partial Class StudentDataSet
Partial Class StudentDataTable
Private Sub CheckStudentName(ByVal rowStudent As StudentDataSet.StudentRow)
If rowStudent.IsStudent_NameNull() OrElse rowStudent.Student_Name = "" Then
' set error
rowStudent.SetColumnError(Me.Student_NameColumn, "Student Name is Required")
Else
' ok clear the error
rowStudent.SetColumnError(Me.Student_NameColumn, "")
End If
End Sub

Private Sub CheckAge(ByVal rowStudent As StudentDataSet.StudentRow)
If rowStudent.IsAgeNull OrElse _
rowStudent.Age < 3 OrElse _
rowStudent.Age > 10 Then
rowStudent.SetColumnError(Me.AgeColumn, "Age must be between 3 to 10")
Else
rowStudent.SetColumnError(Me.AgeColumn, "")
End If
End Sub

Private Sub StudentDataTable_ColumnChanged(ByVal sender As Object, ByVal e As System.Data.DataColumnChangeEventArgs) Handles Me.ColumnChanged
If e.Column Is Me.Student_NameColumn Then
Call Me.CheckStudentName(CType(e.Row, StudentRow))
ElseIf e.Column Is Me.AgeColumn Then
Call Me.CheckAge(CType(e.Row, StudentRow))
End If
End Sub

Private Sub
StudentDataTable_TableNewRow(ByVal sender As Object, ByVal e As System.Data.DataTableNewRowEventArgs) Handles Me.TableNewRow
Call Me.CheckStudentName(CType(e.Row, StudentRow))
Call Me.CheckAge(CType(e.Row, StudentRow))
End Sub
End Class
End Class

First we have created 2 private methods

1) CheckStudentName() - validates the Student Name column
2) CheckAge() - validates the Age column

Then we have used 2 DataTable Events

1) ColumnChanged - in this event handler we check which column has been changed then we call the method according to that column
2) TableNewRow - in this event handler we execute both methods, since whole row is chagned

Here we have done with our Custom Validation. Now we just simply put the DataGridView control on Form, bind it with this DataTable and the rest of the things will be handled by DataGridView itself.

DataGridView:
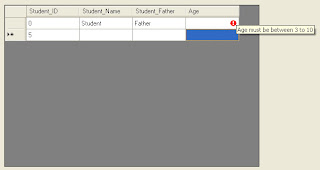
As you can see the DataGridView is Displaying a Red Icon in the Age column and it displays a ToolTip of Error that we have set in our Validation.

And finally when we are about to Save this Table, then we will first check the Error as,

If Me.StudentDataSet.Student.HasErrors() Then
MsgBox("Table contains Error, cannot save", MsgBoxStyle.Exclamation, "Save")
Else
MsgBox("Table does NOT contain any Error, can Save now", MsgBoxStyle.Information, "Save")
End If

Detail View:
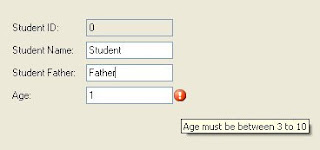

Now we can implement the same thing in our Detail View. As you can see the above Form I have put the TextBox Controls and have Bind them with the same Table. But to show the Error Icon we will use the ErrorProvider Component.

1) Add the ErrorProvider Component
2) Set its BindingSource to the StudentBindingSource

That is it, ErrorProvider will display the Error Icon with TextBox that violates the Business Rule. Note that StudentBindingSource is the same BindingSource which is Bound with the TextBox Controls.

Project Details:
Custom Validation on Typed DataTable

Project Download:
CustomValidation.zip

Tuesday, June 24, 2008

Try...Catch and Transaction in SQL Server 2005

Level: Intermediate

Knowledge Required:
  • T-SQL
  • SQL Server 2005
  • Stored Procedure

Description:
In Stored Procedure (having lots of INSERTs, UPDATESs and DELETEs) we use Transaction (Begin Tran, Commit Tran, RollBack Tran). We usually begin with Begin Tran and on some error we do RollBack Tran and if NO error occurred we Commit Tran.

A better way to do this task is to use the Try...Catch in SQL Server 2005. For example:
    Begin Try
BEGIN TRAN;

INSERT INTO ....

SELECT ...

INSERT INTO ...

DELETE ...

DELETE ...

INSERT ...

COMMIT TRAN;
End Try
Begin Catch
ROLLBACK TRAN;

DECLARE @ErrorMsg varchar(max);
DECLARE @ErrorSeverity int;
DECLARE @ErrorState int;

SET @ErrorMsg = ERROR_Message();
SET @ErrorSeverity = ERROR_SEVERITY();
SET @ErrorState = ERROR_STATE();

RAISERROR(@ErrorMsg, @ErrorSeverity, @ErrorState);
End Catch


As you can see,

1) We start the Transaction in Try...Catch block
2) Next we move forward and try to do insert, update and delete
3) If any error occurred during these statements the Exception will be caught in the Begin Catch...End Catch block
4) Then in this block we have first Rolled Back the Transaction
5) Then again throw the exception so the caller should know that some error was occurred during processing
6) And if NO exception occured then finally before the End Try we have Committed the Transaction

Monday, June 23, 2008

Paste Text in DataGridView Control (Bound with BindingSource)

DataGridView control does NOT have the built-in Paste functionality. Therefore we are going to create a Generic Function which will Paste Text in DataGridView control.

Level: Intermediate

Knowledge Required:
  • DataGridView
  • Clipboard
  • String
  • BindingSource
  • DataTable
Description:
In the my earlier post:

DataGridView Control FAQs and Quick Tips

I have discussed how to Copy Data from DataGridView control to Clipboard. Now we will see how can we Paste Data from Clipboard to DataGridView control. The following function is Generic for DataGridView control which is bound with some BindingSource. Optionally user can provide the DataTable (which is DataGridView source). This parameter is used in the function to check a Column whether it is Read-Only or NOT.

Features:
1) Paste Data at the End: Set the current position at the last row (which creates the new row) and execute the function, new rows will be added
2) Paste Data in the middle rows: Set the current position anywhere in middle (not at end) and execute the function, middle rows will be overwritten by new data
3) Paste Data in any column: Set the current position in any column and execute function, function will start pasting data from that particular column

Public Sub PasteInBoundDataGridView(ByVal dgvToUse As DataGridView, ByVal bsDataGridView As BindingSource, ByVal tblSource As DataTable)
Dim iCurrentRow As Integer = -1
Dim bFullRowSelected As Boolean = False

' if some row is selected
If dgvToUse.CurrentRow IsNot Nothing Then
' if it is NOT a new row
If Not dgvToUse.CurrentRow.IsNewRow Then
' get the index of that row
iCurrentRow = dgvToUse.CurrentRow.Index
End If

' if current row is selected
If dgvToUse.CurrentRow.Selected Then
' it means full row is selected
bFullRowSelected = True
End If
End If


' cancel the current edit
bsDataGridView.CancelEdit()

Dim sText As String
Dim sLines() As String
Dim iCurCol As Integer

' if full row is selected
If bFullRowSelected Then
' then set the initial column = 0
iCurCol = 0
Else ' else if full row is NOT selected
' set the initial column = current column
iCurCol = dgvToUse.CurrentCell.ColumnIndex
End If

' get the text from clipboard
sText = My.Computer.Clipboard.GetText()
' split the text into lines
sLines = sText.Split(New String() {vbCrLf}, StringSplitOptions.RemoveEmptyEntries)
' for each line in extracted lines
For Each sLine As String In sLines
Dim sColValues() As String
' split the line into columns
sColValues = sLine.Split(vbTab)

Dim c As Integer = iCurCol
Dim rowEdit As DataRowView

' if currently some middle rows are selected and also
' selected row is NOT the last row

If iCurrentRow >= 0 AndAlso iCurrentRow < dgvToUse.Rows.Count - 1 Then
' row is selected row
rowEdit = CType(dgvToUse.Rows(iCurrentRow).DataBoundItem, DataRowView)
' now move to next row
iCurrentRow += 1
Else ' else it means we are at end then
' we will add the row

rowEdit = bsDataGridView.AddNew
End If

' for each column in extracted columns
For Each sColValue As String In sColValues
' if this column is bound
If dgvToUse.Columns(c).DataPropertyName <> "" Then
' if some table is mentioned and also
' the column in which we are going to paste is NOT read-only

If tblSource Is Nothing OrElse _
Not tblSource.Columns(dgvToUse.Columns(c).DataPropertyName).ReadOnly Then
' if extracted value is empty string
If sColValue = "" Then
' then paste the DBNULL.value
rowEdit(dgvToUse.Columns(c).DataPropertyName) = DBNull.Value
Else ' else it means some value is mentioned
' then paste that value
rowEdit(dgvToUse.Columns(c).DataPropertyName) = sColValue
End If
End If
End If

' increase the column count
c += 1
' if reached at last column then stop setting values in columns
If c >= dgvToUse.Columns.Count Then Exit For
Next ' next column

' ok row edit is complete so end it

bsDataGridView.EndEdit()
Next 'next line
End Sub

Usage:
Private Sub Paste()
Try
If Not Me.DataGridView1.IsCurrentCellInEditMode Then
Call PasteInBoundDataGridView(Me.DataGridView1, Me.BindingSource1, Me.DataSet1.DataTable1)
End If
Catch
ex As Exception
MsgBox(ex.Message, MsgBoxStyle.Exclamation, "Paste")
End Try
End Sub


See Also:
DataGridView Control FAQs and Quick Tips

Thursday, June 19, 2008

Get Unique Values from a Comma-Delimited String

Level: Intermediate

Knowledge Required:
  • Array
  • String

Description:
Here is a function that extracts out the unique values from comma delimited string.
Public Function GetUnique( _
ByVal sStringToUse As String, _
Optional ByVal sSeperator As String = ",", _
Optional ByVal LimitWords As Integer = 0 _
) As String
Dim sStrings() As String
Dim sToRet As String = ""

sStrings = sStringToUse.Split(sSeperator)

Dim i As Integer = 0
For Each s As String In sStrings ' for each item in array
Dim sTrimed As String = s.Trim()
' if limit is supplied and also limit is NOT over
If Not (LimitWords < 1 OrElse i < LimitWords) Then Exit For
' if this item is NOT added previously
If sToRet.IndexOf(sTrimed, StringComparison.CurrentCultureIgnoreCase) < 0 Then
i += 1
sToRet &= sTrimed & "," ' add it in list
End If
Next


If sToRet.Length > 0 Then ' if items found
' return them

Return sToRet.ToString().Substring(0, sToRet.Length - 1)
Else ' else (item NOT found)
Return "" ' return empty string
End If
End Function

Usage:
Dim a As String
a = "computer,hardware,computer,software,hardware,tools,downloads,software"
Debug.Print(GetUnique(a))

Output:
computer,downloads,hardware,software,tools

Friday, June 13, 2008

How to Make a Bit Zero in an Integer (Bitwise Operation)

Level: Intermediate

Knowledge Required:
Bitwise Operations

Description:
Sometimes it is required to make a certain bit Zero in an Integer value. For example,

Dim f As FontStyle
f = FontStyle.Bold Or FontStyle.Italic


So in the above Code we have put Bold and Italic both, now suppose we want to remove the Bold then we will use XOR Bitwise Operator as,

f = f XOR FontStyle.Bold

The Bold bit will be set to zero.

XOR:

0 XOR 0 = 0
0 XOR 1 = 1
1 XOR 0 = 1
1 XOR 1 = 0


Note that XOR is actually reverting the bit i.e. 0 (Zero) to 1 and 1 to 0 (Zero). Therefore use XOR if you are sure that the bit we are going to make 0 (zero) is currently 1, otherwise see the following article.

See Also:
How to check a Bit whether it is 1 or 0 (zero) in an Integer (Bitwise Operations)
How to add/remove Attribute from File (Bitwise Operation)

Wednesday, June 11, 2008

Dynamically Loading Data in TreeView Control

This article explains how to load data dynamically i.e. on runtime in TreeView Control. In this article we will discuss,
  • How to Store custom User Information with each Node of TreeView Control
  • Dynamically adding Nodes on Runtime

Level: Intermediate

Knowledge Required:
  • TreeView Control
  • Table
  • SQL Server Stored Procedure
  • ADO.net
  • DataTable
  • Inheritance

Description:
Sometimes we face a scenario in which we need to display the Data in TreeView control, in such a way that we do NOT load the whole Tree in one go, instead we load only root items first, and when user expands a node, then we load the child items of that particular node and add them underneath.

I am going to divide this solution in 4 phases
  1. Setup Database (an example)
  2. Setup Application to Database Connectivity
  3. Setup Custom TreeNode Class
  4. Putting it altogether
If you can understand the initial 2 phases then you can directly jump to phase 3.

Phase 1: Setup Database (an example)
We will create a table first, for example,

tbl_SearchEngineDirectory
  • Category_ID (primary key)
  • Category_Name
  • CategoryParent_ID (null able, foreign key, linked to Category_ID of this table)

So the above table is to store the Directory Structure of a Search Engine. For the Root entries we will store NULL in CategoryParent_ID column. Now we will create a stored procedure in Database which will return the Categories by supplying its Parent ID,

CREATE PROCEDURE GetCategory
@CategoryParent_ID int = NULL
AS
BEGIN
SET NOCOUNT ON
;

SELECT *
FROM tbl_SearchEngineDirectory
WHERE (CategoryParent_ID = @CategoryParent_ID) OR
(@CategoryParent_ID IS NULL AND CategoryParent_ID IS NULL);
END

Note that in above procedure if we pass NULL then it will return only the Root Categories.

Phase 2: Setup Application to Database Connectivity
Now we will implement this procedure in our Data Access Layer Class and for example have created a Function which will return the DataTable as,

Public Function GetCategory(ByVal CategoryParent_ID As Nullable(Of Integer)) As DataTable

(I am NOT discussing the internal code of above function as it is beyond the scope of this topic.)

Phase 3: Setup Custom TreeNode Class
This is one of the main steps since we will face an issue,

How are we going to Recognize which Node is expanded through which we can load the Children of that particular Node.

For this purpose we will create our own TreeNode class which is actually inherited from the same class but we will expand our properties with it as,

Public Class CategoryNode
Inherits TreeNode

Private _Category_ID As Integer
Private _Category_Name As String
Private _CategoryParent_ID As Nullable(Of Integer)

Public Property Category_ID() As Integer
Get
Return Me._Category_ID
End Get
Set
(ByVal value As Integer)
Me._Category_ID = value
End Set
End Property

Public Property Category_Name() As String
Get
Return Me
._Category_Name
End Get
Set
(ByVal value As String)
Me._Category_Name = value
End Set
End Property

Public Property CategoryParent_ID() As Nullable(Of Integer)
Get
Return Me._CategoryParent_ID
End Get
Set
(ByVal value As Nullable(Of Integer))
Me._CategoryParent_ID = value
End Set
End Property


Public Sub New(ByVal iCategory_ID As Integer, ByVal sCategory_Name As String)
Me._Category_ID = iCategory_ID
Me._Category_Name = sCategory_Name
Me._CategoryParent_ID = Nothing
End Sub

Public Sub New(ByVal iCategory_ID As Integer, ByVal sCategory_Name As String, ByVal iCategoryParent_ID As Integer)
Me.New(iCategory_ID, sCategory_Name)
Me._CategoryParent_ID = iCategoryParent_ID
End Sub

Public Overrides Function ToString() As String
Return Me._Category_Name
End Function
End Class

Phase 4: Putting it altogether
We will load each node in such a way that each Node will have a Temporary Child node for the first time. This is because we do NOT know whether any node has children OR not, and we want to display a Plus Sign with it. If we don’t do this then the node will never be able to expand since it has NO children. So whenever a node is expanded first we will remove the Temporary Node and then will add its Children, and if NO child exists in Database then we do nothing, and since the Temporary Node is already deleted therefore the Plus sign will also be removed.


We know that whenever a Node is expanded in the TreeView control 2 events are triggered,

1) BeforeExpand
2) AfterExpand

We can use both events, here I am going to use the 2nd event. In the handler of this event we will be getting the Node which is expanded. Here is the full code for Form1

Public Class Form1
Private Sub Form1_Load(ByVal sender As Object, ByVal e As System.EventArgs) Handles Me.Load
Call Me.FillParentCategories()
End Sub

Public Sub FillParentCategories()
Dim tblCat As DataTable
' Get Parent/Root Nodes only
tblCat = CateogryDataAccessClass.GetCategory(Nothing)
' now add them in TreeView
Me.AddCategories(Me.TreeView1.Nodes, tblCat)
' dispose the DataTable
tblCat.Dispose()
End Sub

' Method: AddCategories()
' Description: This method adds the Categories in the given NodeCollection
' Parameters:
' NodeCollection - Collection to be used to add Categories
' Categories - DataTable in which Categories are loaded

Private Sub AddCategories(ByRef NodeCollection As TreeNodeCollection, ByRef Categories As DataTable)
For Each r As DataRow In Categories.Rows
Dim nodCategory As CategoryNode
' if this is the Root element
If r.IsNull("CategoryParent_ID") Then
nodCategory = New CategoryNode(r("Category_ID"), r("Category_Name"))
Else
nodCategory = New CategoryNode(r("Category_ID"), r("Category_Name"), r("CategoryParent_ID"))
End If
' adding a Temporary Node
nodCategory.Nodes.Add("Loading...")
' Now add this node in the given collection
NodeCollection.Add(nodCategory)
Next
End Sub


Private Sub TreeView1_AfterExpand(ByVal sender As Object, ByVal e As System.Windows.Forms.TreeViewEventArgs) Handles TreeView1.AfterExpand
Dim nodFirst As TreeNode
nodFirst = e.Node.Nodes(0)
' if First Node is NOT the Category Node then
' it means we haven't filled this Node yet

If Not TypeOf nodFirst Is CategoryNode Then
' nodFirst is the temporary node we will remove it
nodFirst.Remove()
' now we are going to load the children
Dim nodCategory As CategoryNode
' first cast the expanded node into our Category node
' so we can check its ID
nodCategory = CType(e.Node, CategoryNode)
Dim tblCat As DataTable
' load its children
tblCat = CateogryDataAccessClass.GetCategory(nodCategory.Category_ID)
' now add them in TreeView
Me.AddCategories(e.Node.Nodes, tblCat)
' dispose the DataTable
tblCat.Dispose()
End If
End Sub
End Class

Summary:
  • On Load event we have loaded the Parent/Root Nodes and have added a Temporary Node with each node so the Plus Sign should be displayed.
  • Whenever a node is expanded:
    • First we check, have we loaded its children? (see code)
    • If NO then we load the children from database and add them in the same way i.e. also add a Temporary node with each node.

Monday, June 2, 2008

How to add the Current Login Details while updating a Row (SQL Server 2005)

Introduction: This article explains how to add the Current Login Details (including, Login ID, Date Time and IP Address) while updating a Row in SQL Server 2005.
Level: Intermediate
Knowledge Required:
  • T-SQL
  • SQL Server 2005
  • Table
  • Default Column Value
  • User Defined Function
Description:
While saving the data in a Table, we can also save the Login Details like Login ID, Date Time and IP Address with each row. This way we can audit the table. To accomplish this we can also handle it in our insert stored procedure but it is better to use the Default Column Values here, since it is much easier and one time job. However we need to do coding in our Update Stored Procedure.

Default Column Value: While inserting the new Row, if we ignore a column and do NOT include in the Column list then SQL Server puts the Default Value (which we have given) to this column also the Column should be Allow Nulls = False, otherwise SQL Server will put NULL into this column.

For example: we have a Table Student as,
  • Student_ID
  • Student_Name
  • Student_FatherName
If we have created a Front-End application and several users are Inserting/Updating the Students. So we cannot track which user inserted that student and which user updated that student. For this purpose we can add 4 columns in our table as,
  • Update_User
  • Update_DateTime
  • Update_IPAddress
  • Update_Count
All fields are Allow Nulls = False

1) To Get the Current Login: SUSER_NAME() Function
2) To Get the Current DateTime: GetDate() Function
3) To Get the IP Address: We will create our own Function

So for the above 2 tasks we have built-in functions, but for the 3rd one we need to create our own function. Fortunately we have discussed this issue in my previous post:

How to get Client IP Address in SQL Server 2005

In the same post we have created a User Defined Function, so we are going to use the same function here.

Thats it, now we only need to put the Default Values for our Columns,

Update_User:
Default Value or Binding: Getdate()

Update_DateTime:
Default Value or Binding: SUSER_NAME()

Update_IPAddress:
Default Value or Binding: dbo.GetCurrentIP()

Update_Count:
Default Value or Binding: 0

Note: To set the Default Value for a column (open table in Design mode)
1) Select the Column (of which you want to set Default Value)
2) Locate the "Default Value or Binding" in the Column Properties (5th property)
3) Type the Value which you want to set as Default

Now open the Table and only type ID, Name and Father Name and refresh the Table you will notice that SQL Server has automatically set the Values for other columns.

Next we will update our Update Stored Procedure as,

CREATE PROCEDURE [dbo].[UpdateStudent] 
@Student_ID int,
@Student_Name varchar(255),
@Student_FatherName varchar(255)
AS
BEGIN
SET NOCOUNT ON
;

UPDATE tbl_Student
SET Student_Name = @Student_Name,
Student_FatherName = @Student_FatherName,
Update_User = SUSER_NAME(),
Update_DateTime = GetDate(),
Update_IPAddress = dbo.GetCurrentIP(),
Update_Count = Update_Count + 1
WHERE
Student_ID = @Student_ID;
End