Showing posts with label How To. Show all posts

Thursday, September 11, 2008

How to handle Overlapping of Large Text Fields in Crystal Reports

Level: Intermediate

Knowledge Required:
Crystal Reports

Description:
While working in Crystal Reports, we sometimes face a scenario when we need to put a Large Text Field (which can grow upto multiple lines). The issue comes if we try to put another Field after this Text Field. Example:


As you can see in above I have put to Formula Fields, both will contain Large Text which may expand. So here is the preview,


Therefore to solve this issue we can create multiple sub-sections in the same section. This can be achieved by Section Expert.


Now we will put the Fields in different sub-sections as,


And here is the preview again,


Note that in Crystal Reports Sections automatically expand, that is why when the first Text Field expands, the section also expands itself, therefore ultimately the next field renders properly.

Wednesday, July 16, 2008

How to Pass Data Across Forms

In this post we will discuss how can we share different variables among Forms.

Level: Beginner

Knowledge Required:
Win Forms

Description:
While creating a Windows Forms Application, we usually face a requirement when we need to pass one or more variables from one Form to another. For example, we have created a Dialog Box which takes Date Range,

When we display this dialog box, we want that a default date range should be given, also this dialog box should return the new Date Range that is selected.

To pass the data to Form we can directly use Form's Control as,

In Form1.Button1.Click Event Handler:

DateRangeDialog.DateTimePicker1.Value = Now

As you can see the above code, I have used the DateRangeDialog's DateTimePicker control in Form1's Button Click event Handler, but it is better to create Public Properties on Form and use them. Also we can utilize the Constructor (New Method).

Public Class dlgDateRange
Private _DateStart As Date
Private _DateEnd As Date

'Public properties that will be used to get the selected dates
Public ReadOnly Property DateStart() As Date
Get
Return Me
._DateStart
End Get
End Property

Public ReadOnly Property
DateEnd() As Date
Get
Return Me.
_DateEnd
End Get
End Property

' default constructor
Public Sub New
()
' This call is required by the Windows Form Designer.
InitializeComponent()
' Add any initialization after the InitializeComponent() call.
Me._DateStart = Now
Me._DateEnd = Now
End Sub

' if dates are supplied on initializing
Public Sub New
(ByVal DateStart As Date, ByVal DateEnd As Date)
Me.New()
' Add any initialization after the InitializeComponent() call.
Me._DateStart = DateStart
Me._DateEnd = DateEnd
End Sub

' OK button is clicked
Private Sub
OK_Button_Click(ByVal sender As System.Object, ByVal e As System.EventArgs) Handles OK_Button.Click
' set the selected values and close dialog
Me._DateStart = Me.DateTimePicker1.Value
Me._DateEnd = Me.DateTimePicker2.Value
Me.DialogResult = System.Windows.Forms.DialogResult.OK
Me.Close()
End Sub

' cancel button is clicked
Private Sub
Cancel_Button_Click(ByVal sender As System.Object, ByVal e As System.EventArgs) Handles Cancel_Button.Click
Me.DialogResult = System.Windows.Forms.DialogResult.Cancel
Me.Close()
End Sub

' on form load event we will set the dates which were supplied on initializing
Private Sub
dlgDateRange_Load(ByVal sender As System.Object, ByVal e As System.EventArgs) Handles MyBase.Load
Me.DateTimePicker1.Value = Me._DateStart
Me.DateTimePicker2.Value = Me._DateEnd
End Sub
End Class

Usage:
Dim dlgNew As dlgDateRange
dlgNew = New dlgDateRange(New Date(2008, 1, 1), New Date(2008, 6, 30))
If dlgNew.ShowDialog() = Windows.Forms.DialogResult.OK Then
Debug.Print("Date Start: " & dlgNew.DateStart)
Debug.Print("Date End: " & dlgNew.DateEnd)
End If

Thursday, July 3, 2008

How to Check Mouse Buttons State

Level: Beginner

Description:
Sometimes it is required to check the Mouse Button state on a certain point. For this purpose we use MouseButtons shared property,

System.Windows.Forms.Form.MouseButtons

Example: in DataGridView SelectionChanged event handler we can determine whether the selection is changed through mouse or not.

Private Sub DataGridView1_SelectionChanged(ByVal sender As Object, ByVal e As System.EventArgs) Handles DataGridView1.SelectionChanged
If System.Windows.Forms.Form.MouseButtons = Windows.Forms.MouseButtons.Left Then
' Selection is Changed by mouse
Else
' Selection is NOT Changed by mouse
End If
End Sub

Thursday, June 26, 2008

How to add Column/Row Validation Using Typed DataTable

In this post we will see how we can add the Validation Rule in Typed DataTable of a Typed DataSet (using Partial Class) and then how can we use this Validation on our Form in DataGridView or Details.

Level: Intermediate

Knowledge Required:
  • Typed DataSet
  • DataTable
  • Partial Class
  • DataGridView
  • ErrorProvider
Description:
This post is based on Beth Massi's Video Tutorial.

As we have used the DataGridView control for entering the data in a DataTable. If we have set one column of our DataTable AllowDBNull = False, then in DataGridView we encounter an exception when we try to enter a Null in this column. This exception can be handled in DataError event of DataGridView control. But the row will be removed from list anyway. So to make it more user friendly, we do the following things,

1) Set the AllowDBNull = True for the column
2) Add Validation Rule in the DataTable

Example:
I have created a Typed DataSet StudentDataSet in which I have added 1 Table
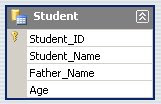

  • Student_ID (primary key, AllowDBNull=False, AutoIncreament=True)
  • Student_Name (AllowDBNull=True)
  • Father_Name (AllowDBNull=True)
  • Age (AllowDBNull=True)
All the columns (except the 1st one) are Allowed to have NULL values. Now we will add the Validation Business Rule in our DataTable by using Partial Class as,

Partial Class StudentDataSet
Partial Class StudentDataTable
Private Sub CheckStudentName(ByVal rowStudent As StudentDataSet.StudentRow)
If rowStudent.IsStudent_NameNull() OrElse rowStudent.Student_Name = "" Then
' set error
rowStudent.SetColumnError(Me.Student_NameColumn, "Student Name is Required")
Else
' ok clear the error
rowStudent.SetColumnError(Me.Student_NameColumn, "")
End If
End Sub

Private Sub CheckAge(ByVal rowStudent As StudentDataSet.StudentRow)
If rowStudent.IsAgeNull OrElse _
rowStudent.Age < 3 OrElse _
rowStudent.Age > 10 Then
rowStudent.SetColumnError(Me.AgeColumn, "Age must be between 3 to 10")
Else
rowStudent.SetColumnError(Me.AgeColumn, "")
End If
End Sub

Private Sub StudentDataTable_ColumnChanged(ByVal sender As Object, ByVal e As System.Data.DataColumnChangeEventArgs) Handles Me.ColumnChanged
If e.Column Is Me.Student_NameColumn Then
Call Me.CheckStudentName(CType(e.Row, StudentRow))
ElseIf e.Column Is Me.AgeColumn Then
Call Me.CheckAge(CType(e.Row, StudentRow))
End If
End Sub

Private Sub
StudentDataTable_TableNewRow(ByVal sender As Object, ByVal e As System.Data.DataTableNewRowEventArgs) Handles Me.TableNewRow
Call Me.CheckStudentName(CType(e.Row, StudentRow))
Call Me.CheckAge(CType(e.Row, StudentRow))
End Sub
End Class
End Class

First we have created 2 private methods

1) CheckStudentName() - validates the Student Name column
2) CheckAge() - validates the Age column

Then we have used 2 DataTable Events

1) ColumnChanged - in this event handler we check which column has been changed then we call the method according to that column
2) TableNewRow - in this event handler we execute both methods, since whole row is chagned

Here we have done with our Custom Validation. Now we just simply put the DataGridView control on Form, bind it with this DataTable and the rest of the things will be handled by DataGridView itself.

DataGridView:
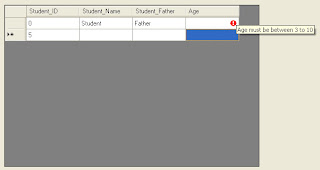
As you can see the DataGridView is Displaying a Red Icon in the Age column and it displays a ToolTip of Error that we have set in our Validation.

And finally when we are about to Save this Table, then we will first check the Error as,

If Me.StudentDataSet.Student.HasErrors() Then
MsgBox("Table contains Error, cannot save", MsgBoxStyle.Exclamation, "Save")
Else
MsgBox("Table does NOT contain any Error, can Save now", MsgBoxStyle.Information, "Save")
End If

Detail View:
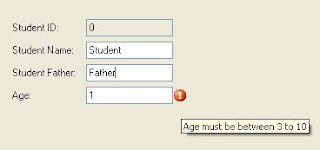

Now we can implement the same thing in our Detail View. As you can see the above Form I have put the TextBox Controls and have Bind them with the same Table. But to show the Error Icon we will use the ErrorProvider Component.

1) Add the ErrorProvider Component
2) Set its BindingSource to the StudentBindingSource

That is it, ErrorProvider will display the Error Icon with TextBox that violates the Business Rule. Note that StudentBindingSource is the same BindingSource which is Bound with the TextBox Controls.

Project Details:
Custom Validation on Typed DataTable

Project Download:
CustomValidation.zip

Sunday, June 15, 2008

How to check a Bit whether it is 1 or 0 (zero) in an Integer (Bitwise Operations)

Level: Beginner

Knowledge Required:
  • Bitwise Operators
  • Enum

Description:
We usually get statuses from different resources, which contains one or more statuses together. So we require to check whether a particular Status is set or NOT.

Normally statuses are set using Enum

Example:

Public Enum EnumFontStyle
Regular = 0
Bold = 1
Italic = 2
Underline = 4
StrikeThrough = 8
End Enum

Public Sub Test()
Dim fs As EnumFontStyle
fs = EnumFontStyle.Bold OR EnumFontStyle.Italic
If fs And EnumFontStyle.Bold Then
MsgBox("Font is Bold")
Else
MsgBox("Font is NOT Bold")
End If
End Sub

To understand how it is working,

Suppose we have an integer = 3 => binary = 11, if we perform,

3 AND 2

This is in binary

11 AND 10

11
AND 10
----------
10 = 2
Hence bit number 2 is 1, because if we do,
4 AND 2 (binary = 100 AND 10)

100
AND 010
----------
000 = 0
This means bit number 2 = 0

See Also:
How to add/remove Attribute from File (Bitwise Operation)
How to Make a Bit Zero in an Integer (Bitwise Operation)

Friday, June 13, 2008

How to add Serial Number Column in DataGridView

This article explains how to add a Serial Number (Row Index) Column in DataGridView control without adding this column in Physical Database or in DataSet's DataTable.


Level: Beginner

Knowledge Required:
  • DataGridView
  • Data Binding

Description:
We use DataGridView control alot of times in Data Manipulation application. Sometimes we require to have a Serial Number (S.No.) Column in DataGridView Control in such a way that no matter how Sorting/Filtering is done, Serial Number should remain constant i.e. in a Sequence.

One way to accomplish this is to create a Column in DataSet's DataTable in which we can store the Serial Numbers, but this will make our job too complex if sorting/filtering is also done. Because we have to re-check the Serial Number column again and again each time the Sorting/Filtering is performed.

So the better way is to use the DataGridView control's Virtual Mode. Here are the steps that we will do,

1) Bind the DataGridView control to some BindingSource and setup its Columns
2) Add another column (Unbound Column) and make it the first column
3) Set its name = ColumnSNo
4) Set its ReadOnly = True
4) Set the DataGridView control's VirtualMode property to True
5) In CellValueNeeded event use the following code:

Private Sub DataGridView1_CellValueNeeded(ByVal sender As Object, ByVal e As System.Windows.Forms.DataGridViewCellValueEventArgs) Handles DataGridView1.CellValueNeeded
If e.RowIndex >= 0 AndAlso e.ColumnIndex = Me.ColumnSNo.Index Then
e.Value = e.RowIndex + 1
End If
End Sub
Note that if we don't set the VirtualMode Property to True then CellValueNeeded event wouldn't fire


Summary:
To display the Serial Numbers we have added an unbound column and set the Virtual Mode Property of DataGridView control to True. Then in CellValueNeeded Event we just return the Row Index whose value is required

How to Make a Bit Zero in an Integer (Bitwise Operation)

Level: Intermediate

Knowledge Required:
Bitwise Operations

Description:
Sometimes it is required to make a certain bit Zero in an Integer value. For example,

Dim f As FontStyle
f = FontStyle.Bold Or FontStyle.Italic


So in the above Code we have put Bold and Italic both, now suppose we want to remove the Bold then we will use XOR Bitwise Operator as,

f = f XOR FontStyle.Bold

The Bold bit will be set to zero.

XOR:

0 XOR 0 = 0
0 XOR 1 = 1
1 XOR 0 = 1
1 XOR 1 = 0


Note that XOR is actually reverting the bit i.e. 0 (Zero) to 1 and 1 to 0 (Zero). Therefore use XOR if you are sure that the bit we are going to make 0 (zero) is currently 1, otherwise see the following article.

See Also:
How to check a Bit whether it is 1 or 0 (zero) in an Integer (Bitwise Operations)
How to add/remove Attribute from File (Bitwise Operation)

Tuesday, June 3, 2008

How to Convert String into Byte Array

Level: Beginner
Knowledge Required:
  • Text Encoding
  • String
  • Array
Description:
As I have discussed in my earlier post

How to Convert Byte Array into String

Now we will see how we can reverse this process i.e. Convert the String into Byte Array. We will use Text Encoding as,

byte array() = System.Text.Encoding.ASCII.GetBytes(string variable)

Usage:

Dim StringVariable As String = "ABC"
Dim ByteArray() As Byte
ByteArray = System.Text.Encoding.ASCII.GetBytes(StringVariable)
For Each b As Byte In ByteArray
Debug.WriteLine(b)
Next

Output will be:
65
66
67

See Also:

How to Convert Byte Array into String

Monday, June 2, 2008

How to add the Current Login Details while updating a Row (SQL Server 2005)

Introduction: This article explains how to add the Current Login Details (including, Login ID, Date Time and IP Address) while updating a Row in SQL Server 2005.
Level: Intermediate
Knowledge Required:
  • T-SQL
  • SQL Server 2005
  • Table
  • Default Column Value
  • User Defined Function
Description:
While saving the data in a Table, we can also save the Login Details like Login ID, Date Time and IP Address with each row. This way we can audit the table. To accomplish this we can also handle it in our insert stored procedure but it is better to use the Default Column Values here, since it is much easier and one time job. However we need to do coding in our Update Stored Procedure.

Default Column Value: While inserting the new Row, if we ignore a column and do NOT include in the Column list then SQL Server puts the Default Value (which we have given) to this column also the Column should be Allow Nulls = False, otherwise SQL Server will put NULL into this column.

For example: we have a Table Student as,
  • Student_ID
  • Student_Name
  • Student_FatherName
If we have created a Front-End application and several users are Inserting/Updating the Students. So we cannot track which user inserted that student and which user updated that student. For this purpose we can add 4 columns in our table as,
  • Update_User
  • Update_DateTime
  • Update_IPAddress
  • Update_Count
All fields are Allow Nulls = False

1) To Get the Current Login: SUSER_NAME() Function
2) To Get the Current DateTime: GetDate() Function
3) To Get the IP Address: We will create our own Function

So for the above 2 tasks we have built-in functions, but for the 3rd one we need to create our own function. Fortunately we have discussed this issue in my previous post:

How to get Client IP Address in SQL Server 2005

In the same post we have created a User Defined Function, so we are going to use the same function here.

Thats it, now we only need to put the Default Values for our Columns,

Update_User:
Default Value or Binding: Getdate()

Update_DateTime:
Default Value or Binding: SUSER_NAME()

Update_IPAddress:
Default Value or Binding: dbo.GetCurrentIP()

Update_Count:
Default Value or Binding: 0

Note: To set the Default Value for a column (open table in Design mode)
1) Select the Column (of which you want to set Default Value)
2) Locate the "Default Value or Binding" in the Column Properties (5th property)
3) Type the Value which you want to set as Default

Now open the Table and only type ID, Name and Father Name and refresh the Table you will notice that SQL Server has automatically set the Values for other columns.

Next we will update our Update Stored Procedure as,

CREATE PROCEDURE [dbo].[UpdateStudent] 
@Student_ID int,
@Student_Name varchar(255),
@Student_FatherName varchar(255)
AS
BEGIN
SET NOCOUNT ON
;

UPDATE tbl_Student
SET Student_Name = @Student_Name,
Student_FatherName = @Student_FatherName,
Update_User = SUSER_NAME(),
Update_DateTime = GetDate(),
Update_IPAddress = dbo.GetCurrentIP(),
Update_Count = Update_Count + 1
WHERE
Student_ID = @Student_ID;
End

How to get Client IP Address in SQL Server 2005

Level: Intermediate
Knowledge Required:
  • T-SQL
  • SQL Server 2005
Description:
While executing some query, sometimes it is required to have the Client's IP Address who is executing this Query.
SELECT client_net_address
FROM sys.dm_exec_connections
WHERE session_id = @@SPID;

We can also put this Query into some function which can be used further.

CREATE FUNCTION [dbo].[GetCurrentIP] ()
RETURNS varchar(255)
AS
BEGIN
DECLARE
@IP_Address varchar(255);

SELECT @IP_Address = client_net_address
FROM sys.dm_exec_connections
WHERE Session_id = @@SPID;

Return @IP_Address;
END

How to Convert Byte Array into String

Level: Beginner

Knowlege Required:
  • Text Encoding
  • String
  • Array
Description:
Sometimes it is required to convert the byte Array into String. For example if we have read the bytes from some Stream (like reading a file or getting data from port) then we may need to convert that Byte Array into String so we can display it somewhere.

For this purpose we use Text Encoding:

StringVariable = System.Text.Encoding.ASCII.GetString(byte array)

Usage:
Dim b(5) As Byte

b(0) = 65
b(1) = 66
b(2) = 67
b(3) = 68
b(4) = 69

Debug.Print(System.Text.Encoding.ASCII.GetString(b))

Output will be:
ABCDE


See Also:

How to Convert String into Byte Array

Thursday, May 29, 2008

How to create Paging for Large Data in SQL Server 2005

In SQL Server 2005 we can create paging, which can be useful to access the Large Data. I have discussed this in my previous post.

Paging in SQL Server 2005

Tuesday, May 27, 2008

How to Create Generic Function

Level: Beginner

Knowledge Required:
Generics in Visual Basic

Introduction:
This article discusses how to create a Generic Function. Example: Create a Generic Function which is used to Find a Form in Open Forms. Useful for:

1) Preventing to create another instance of a Form
2) Finding a De-Activated / NOT Focused Window and set Focus on it

Description:
In my starting Post I discussed a situation where we require to find a Form which is opened. Now we will create a Generic Function which will return that particular type of Form.

Public Function GetWindow(Of T As Form)() As Form
For Each frmEach As Form In My.Application.OpenForms
If TypeOf frmEach Is T Then
Return frmEach
End If
Next
Return Nothing
End Function
Usage:
Public Sub ShowForm2()
' We will create a new instance of Form2
Dim frmNew As Form2
' Call GetWindow() function which returns that type of Window if open
frmNew = GetWindow(Of Form2)()
' GetWindow() returns NOTHING if window NOT found
If frmNew IsNot Nothing Then
frmNew.Show()
frmNew.Focus()
Else
' OK it means Window NOT Opened so create new instance
frmNew = New Form2
frmNew.Show()
End If
End Sub

Monday, May 26, 2008

How to Iterate TreeView Nodes Recursively

Level: Intermediate
Knowledge Required:
  • Recursion
  • TreeView Control

Description:
In this article we will use a code which Recursively Iterates through each TreeView Node.

Private Sub IterateTreeViewNodesRecursively(Optional ByRef ParentNode As TreeNode = Nothing)
Dim objNodes As TreeNodeCollection

' if parentnode is NOT given then use treeview's nodes
If ParentNode Is Nothing Then
objNodes = Me.TreeView1.Nodes
Else ' else it means parentnode is mentioned so use it's nodes
objNodes = ParentNode.Nodes
End If

For Each n As TreeNode In objNodes
' perform your checking here
'E.g.:
'If n.Checked Then
' ' perform your operation here
'End If
'If n.Tag = "FOLDER" Then
' ' perform your operation here
'End If

If n.Nodes.Count > 0 Then ' if this node has children
' iterate each children
Call IterateTreeViewNodesRecursively(n)
End If
Next
End Sub


Note that if you want to access the checked nodes only you can use the above code but I have discussed another approach in the earlier post you can also see it.

Saturday, May 24, 2008

How to Add SQL Server Built-in/User Defined Function in Typed DataSet as Queries

Issue: SQL Server Function in Typed DataSet does NOT return value
Level: Intermediate
Knowledge Required:
  • T-SQL
  • SQL User Defined Function
  • Typed DataSet
  • TableAdapter

Introduction:
This article explains how to add the SQL Server’s User Defined or Built-in Function in Typed DataSet. Note that if we do NOT follow the proper way then Function might NOT return any value in Visual Basic.

Description:
As we have used the Typed DataSets in VB 2005, which are primarily used to store the data, loaded from Database. We can also use the Typed DataSets to execute SQL Server functions (either built-in or user Defined).

For this purpose first I will show you the normal procedure:

1) Add any User Defined Function in the Database
e.g.: The following function returns the server date


CREATE FUNCTION [dbo].[GetServerDate] ()
RETURNS DateTime
AS
BEGIN

DECLARE @Result AS DateTime;

SELECT @Result = GetDate();

RETURN @Result;
END


2) In Visual Studio 2005, create a new Windows Application Project
3) Add a New Empty DataSet (Data->Add New Data Source) (DO NOT select any tables/procedures/etc.)
4) Open the DataSet in Designer
5) Right Click in the Designer and Click on Add->Query


6) In the TableAdapter Query Configuration Wizard, select the "Use existing stored procedure" option (on page 2)


7) In the next step select the GetServerDate procedure from given List


8) Click Finish

This will add a Query TableAdapter in our DataSet and have added a Function GetServerDate which can be called using Code as,


Dim adp As MyDataSetTableAdapters.QueriesTableAdapter
Dim o As Object

adp = New MyDataSetTableAdapters.QueriesTableAdapter
o = adp.GetServerDate()

But here adp.GetServerDate() will always return Nothing. I think this is because internally when TableAdapter executes the Procedure it does NOT pass the parameters properly.

To overcome this issue we will use a slightly different approach.

Proceed the above given steps up to Step 5, then:

6) In the TableAdapter Query Configuration Wizard, this time select "Use SQL Statements" option, click Next
7) Select "SELECT which returns a single value" option, click Next


8) In the next step type the following SQL Query and click Next
SELECT dbo.GetServerDate()

9) Next we will supply the Function Name (which will be used in coding), type GetServerDate here
10) Click Finish

Now we will again test the function with same code given above and you will notice it returns a Value i.e. DateTime on Server.

In the above example we have used the SQL Server User Defined Function, we can also use the SQL Server's Built-in Function. For Example in the above steps, replace the SQL Statement in Step 8 to the following SQL Statement.
SELECT Is_Member(@Role)

Above function will check the Current Login in the Particular Role.

Saturday, May 17, 2008

How to Get Multiple Rows from Database using Comma Separated IDs (Primary Keys in Delimited String)

Level: Intermediate

Knowledge Required:
  • T-SQL
  • SQL Server Stored Procedure
  • SQL Server User Defined Table Functions


Description:
Sometimes it is required that we need to send more than 1 primary keys to the Database and get the Rows from Table. For example, we want to get all the Rows in which Primary Key = 1, 23, 66 and 99. For this purpose we can create a Dynamic SQL Query in our Application and then execute it as,

SELECT * FROM tbl_SomeTable WHERE PrimaryKey IN (1, 23, 66, 99)


But if we have done all our work using Stored Procedures then we need to execute the same stored procedure 4 times.

CREATE PROCEDURE dbo.GetSomeTableRow
@PrimaryKey int
AS
Begin

SET NOCOUNT ON;

SELECT *
FROM tbl_SomeTable
WHERE PrimaryKey = @PrimaryKey;
End


Now we want to send the IDs to this Stored Procedure in one go. We can achieve this by creating a Delimited String, e.g.:
Dim sIDs As String
sIDs = "1, 22, 33, 99"

Then we will create a stored procedure which will accept this Delimited String and return rows. But before creating this Stored Procedure we will first create a User Defined Table Function which will accept the Delimited String and Return the Table having 1 int Field/Column. This function will extract out each integer value from String and add it in a Table then return that Table.

Following is the Script of this function:

CREATE FUNCTION [dbo].GetIntTableFromDelimitedString
(
@DelimitedString varchar(max),
@Delimiter varchar(10)
)
RETURNS
@ReturnTable TABLE(
IntValue int
)
AS
Begin

DECLARE @EachItem varchar(255);
DECLARE @DelimiterPos int;
DECLARE @DelimiterPosPrv int;

SET @DelimitedString = @DelimitedString + ',';
SET @DelimiterPosPrv = 1;
SET @DelimiterPos = CHARINDEX(@Delimiter, @DelimitedString, 1);

WHILE @DelimiterPos > 0
BEGIN
SET @EachItem = LTRIM(RTRIM(SUBSTRING(@DelimitedString, @DelimiterPosPrv, @DelimiterPos - @DelimiterPosPrv)));
IF @EachItem <> ''
INSERT INTO @ReturnTable(IntValue)
VALUES(CAST(@EachItem AS int));
SET @DelimiterPosPrv = @DelimiterPos + 1;
SET @DelimiterPos = CHARINDEX(@Delimiter, @DelimitedString, @DelimiterPosPrv);
END

Return;
End

Now we can change our Stored Procedure as

CREATE PROCEDURE dbo.GetSomeTableRows
@PrimaryKeys varchar(max)
AS
Begin

SET NOCOUNT ON;

SELECT *
FROM tbl_SomeTable
WHERE PrimaryKey IN (
SELECT IntValue
FROM dbo.GetIntTableFromDelimitedString(@PrimaryKeys, ',')
);
End

Thursday, May 15, 2008

How to Get Image from Internet / How To Load Online Image into Image Class

Level: Intermediate

Knowledge Required:
  • WebClient Class
  • MemoryStream Class
  • Image Class

Description:
We have used Image class to create images. One of its Shared member is
Image.FromFile(filename)
Which we can use as,
Dim i As Image
i = Image.FromFile("C:\MyTest.Jpg")
This will create a New instance of Image Class with MyTest.Jpg Loaded. We can then use this image in different controls like PictureBox.

But this method does NOT support URI. For example we have an image at:

http://www.google.com/intl/en_ALL/images/logo.gif

We cannot use as,

Dim i As Image
i = Image.FromFile("http://www.google.com/intl/en_ALL/images/logo.gif")


This will through an exception. So to Load images (programitically) that are stored online we will use the following code,


Private Function GetOnlineImage(ByVal URL As String) As Image
Dim i As Image
Dim w As New Net.WebClient
Dim b() As Byte
Dim m As System.IO.MemoryStream

' download the Image Data in a Byte array
b = w.DownloadData(URL)

' create a memory stream from that Byte array
m = New System.IO.MemoryStream(b)
' now create an Image from Memory Stream
i = Image.FromStream(m)

' release the WebClient
w.Dispose()

' return image
Return i
End Function

' Usage
Private Sub Form1_Load(ByVal sender As System.Object, ByVal e As System.EventArgs) Handles MyBase.Load
Dim i As Image
i = Me.GetOnlineImage("http://www.google.com/intl/en_ALL/images/logo.gif")
Me.PictureBox1.Image = i
End Sub


Tuesday, May 13, 2008

How To Increase Performance of Loading Large Data from Database (Part-3)

Level: Advanced

Knowledge Required:
Part-3:
  • Typed DataSet
  • TableAdapter
  • DataGridView


Description:
So far we have discussed the 2 better ways of loading large data,

Implement Paging in SQL Server 2005
Implement Paging in Application using SQLDataAdapter

Now the last one is to use to Virtual Mode of DataGridView control. Here we will NOT use the Data Binding since I have already discussed in Part-1 that Data Binding also slows down the process.

When DataGridView control is in Virtual Mode (VirtualMode=True) then CellValueNeeded Event is triggered for Unbound Columns. In the same event we receive the Row and Column Index, in which DataGridView is needing the Value. Therefore we just go in the same Row and Column of our loaded DataTable, get the Value and give to the DataGridView control.


So what we will do is,

  1. Create a DataGridView Control NOT bound to anything
  2. Add the Columns (manually) equal to number of Columns in our DataTable
  3. Set the property of DataGridView Control i.e. VirtualMode = True
  4. Load the Data in our DataTable which is also NOT bound to anything
  5. Add the same number Rows in the DataGridView
  6. And finally in the CellValueNeeded event you can use the following code


Private Sub grdLargeData_CellValueNeeded(ByVal sender As Object, ByVal e As System.Windows.Forms.DataGridViewCellValueEventArgs) Handles grdLargeData.CellValueNeeded
Dim rowLargeData As LargeDataDataSet.LargeDataRow
rowLargeData = Me.dsLargeData.LargeData(e.RowIndex)
e.Value = rowLargeData(e.ColumnIndex)
End Sub


This approach is a bit faster as compare to the Data Bound version. But has limitations i.e. Ordering and Filtering cannot be performed.

Source Code:
LargeDataWithVirtualDGV.rar
Database:
TemporaryDB.rar
Note: Execute the ScriptToInsertBulkData.sql file (ziped inside the TemporaryDB.rar) to add the Fake Data

Monday, May 12, 2008

How To Increase Performance of Loading Large Data from Database (Part-2)

Level: Advanced

Knowledge Required:
Part-2:
  • Typed DataSet
  • TableAdapter
  • DataAdapter
  • Partial Class
  • Data Binding

Description:
In my previous post, I showed you how to Implement Paging in SQL Server 2005 (Database Level). In this post I will discuss How To Implement Paging Using DataAdapter (Application Level). This is a simple technique,

SQLDataAdapter gives us an option to load the Data from Particular Row and to Limit the Loading of Data by providing the Maximum Number of Records to be Loaded. The Fill Method of SQLDataAdapter has 5 Declarations, one of them is:
SQLDataAdapter.Fill(StartRecord, MaxNumberOfRecordsToLoad, ParamArray DataTables())
We will use the above Fill Method to start loading Data from Particular Record Number and Limit the SQLDataAdapter to load only 20 or 30 Records, as per our Page Size.


To implement it professionaly, we will create another Fill Method in our TableAdapter Class (using Partial Class) as,


Partial Class LargeDataTableAdapter
Public Function FillByDataAdapterPaging(ByRef LargeDataDataTable As LargeDataSet.LargeDataDataTable, ByVal PageNumber As Integer, ByVal PageSize As Integer) As Integer
Dim StartRow As Integer
StartRow = ((PageNumber - 1) * PageSize)
Me.Adapter.SelectCommand = Me.CommandCollection(0)
If (Me.ClearBeforeFill = True) Then
LargeDataDataTable.Clear()
End If
Dim returnValue As Integer = Me.Adapter.Fill(StartRow, PageSize, LargeDataDataTable)
Return returnValue
End Function
End Class


Source Code:
LargeDataWithDataAdapterPaging.rar
Database:
TemporaryDB.rar
Note: Execute the ScriptToInsertBulkData.sql file (ziped inside the TemporaryDB.rar) to add the Fake Data

Saturday, May 10, 2008

How To Increase Performance of Loading Large Data from Database (Part-1)

Issue: While loading Large amount of Data from Database:
  • Connection Timeout occurs
  • Application gets Hang/Stuck
  • Application takes too much time to load data

Level: Advanced

Knowledge Required:
Part-1:
SQL Server 2005
Stored Procedures

Description:
First of all this is NOT a good practice to load ALL THE DATA from a Table into memory. A Human being cannot process/analyse all this huge data in a glance, instead we usually interested in a short information. For example we have a Table that contains all the Contact Numbers living in the City along with there Addresses and Names. Now we usually want to extract out one particular number or one particular name, NOT all the names and numbers.

But still we (developers) are forced to create such applications which give the user to access all the data by SCROLLING up or down.

So in this Article I will show you how to increase this performance by the following ways:

  1. Implement Paging in SQL Server 2005 (Database Level)
  2. Implement Paging using DataAdapter (Application Level)
  3. Use the Virtual Mode of DataGridView Control
In this part I will discuss the 1st one.
1) Paging in SQL Server 2005
Paging means we divide our huge data into number of small chunks. We will display 1 page at a time and will provide next previous buttons so user can navigate forward and backword. I think this is the fastest way to load data. We will send the Page Number and Number of Records Per Page to Stored Procedure, which will return only that part of data. For example: I have created a Table tbl_LargeData in which there are 3 Fields:

  • Row_ID [primary key, int, Identity Column]
  • SomeData [varchar(255)]
  • InsertDateTime [DateTime, Default = GetDate()]
In this table I have put some fake data with Total 1,000,000 Rows.

Now this is a bit Large Data (NOT that much Large). Now to test, I created a project in VB and simply loaded the Data (in a DataTable) by executing the Query

SELECT * FROM tbl_LargeData

I have 1 GB RAM and AMD Athlon 64 Processor 3500+.

Unbound DataTable: It took 28 Seconds to fill the DataTable.
Bound DataTable: I bind that DataTable to BindingSource, it took 51 seconds, almost double.

BindingSource also increases time to Fill a DataTable, becuase BindingSource itself keeps another Cache of Data for Sorting and Filtering Purpose.


The Loading of Data can significantly increase Time, if:

  • System has low RAM and Processing Speed
  • Other Applications are also running on Client PC
  • Database Server is NOT on same machine, it is somewhere on the LAN
  • Client PC is connected to server using low Band Width
Therefore to Implement Paging I have created 2 Stored Procedures in Database:

  1. GetLargeDataPageInfo
  2. GetLargeDataWithPaging
The GetLargeDataPageInfo stored procedure has a Parameter @PageSize int. User has to provide the Page Size (i.e. Number of Records Per Page) then this stored procedure will return

Total RecordsTotal Pages
100000050000


GetLargeDataWithPaging stored procedure is the main stored procedure which Returns the Particular Page of Data. The script is:


CREATE PROCEDURE [dbo].[GetLargeDataWithPaging]
@PageNumber int,
@PageSize int
AS
BEGIN
SET NOCOUNT ON;

-- For Paging we have used the ROW_NUMBER() function
-- which operates on Ordering of Column

DECLARE @RowStart int;
DECLARE @RowEnd int;

-- Calculate the first row's Index
-- and Last Row's Index
SET @RowStart = ((@PageNumber - 1) * @PageSize) + 1;
SET @RowEnd = @RowStart + @PageSize - 1;

SELECT Row_ID, SomeData, InsertDateTime
FROM (
SELECT ROW_NUMBER()
OVER (
ORDER BY Row_ID
) AS Row_Num,
*
FROM tbl_LargeData
) AS DerivedTable
WHERE Row_Num Between @RowStart AND @RowEnd;
END


Source Code:
LargeDataWithSQLPaging.rar
Database:
TemporaryDB.rar
Note: Execute the ScriptToInsertBulkData.sql file (ziped inside the TemporaryDB.rar) to add the Fake Data

Update (12-May-2008): Point #2 changed to "Implement Paging using DataAdapter" which was "Implement Paging using DataReader"